
How to make a Christmas tree from cardboard and candies. DIY candy tree - how to make it at home

Somewhere in Europe? How to do this in a regular hotel room? If you have a pair of dexterous hands, and the tools are scissors, glue or double-sided tape, then consider that you are provided with the main symbol of the New Year. In this article we will talk about how to make a Christmas tree from candies. The process of making it is very simple, and most importantly, entertaining. Even five-year-old children can be involved in the work. The resulting tree looks elegant and does not fall off. And how nice it is to take it apart and taste the decorations! Below you will find some interesting ideas on how to make such a creative Christmas tree. Read and dare!
Master class: Christmas tree made of candies
To build a Christmas tree, you need a frame, fastening materials and the decorations themselves. Along with sweets, you can use “rain” or tinsel. Let's consider two options. In the first case, you are not limited in the choice of tools. And in the second, you are actually sitting in a hotel room, and all you have at hand is tape or glue. So, the first option: a carefully made homemade candy tree. Step-by-step photos will help you understand this simple production process. Take a rectangular or square piece of cardboard and roll it into a cone. We fasten the edges with PVA glue. Use scissors to trim the bottom side of the cone so that it is stable. This is the frame of the future Christmas tree. Here, in passing, it should be noted that it can also be made from polystyrene foam. But then you need to secure the lightweight material to some kind of base. You can put a New Year's present in a cardboard cone. After all, gifts are always placed under the Christmas tree. A weight in the middle will give the cardboard cone stability. Then you should think about the bottom cover. Cut out a circle of the required diameter from cardboard and, wrapping the gift inside, glue it to the bottom edge of the cone. To better bond the two surfaces, cut it with fringe.

Frame decor
No matter how thickly we stick the candies on later, the white surface of the Whatman paper will still show through. To prevent this from happening, we will paint the frame green. This can be done using spray acrylic paint or regular gouache. Or use green wrapping paper, fabric, ribbons, etc. To make the candy tree look like a real one, we will also make a fringe from tinsel. The concept of the top should be thought through. The most convenient option is a star-shaped lollipop. Sharpen the lower end of the wooden holder with a knife. Stick it into the top of the cone. Hook the edge of the green tinsel onto the wooden stick. To summarize: what do we have at this stage? A green cardboard cone with a candy cane and a ribbon of tinsel protruding from the top. Let's try to turn this unpleasant sight into an originally decorated New Year's tree.
Christmas tree decoration
We will need a kilogram of chocolates and about five meters of tinsel (preferably green). We draw circles on the surface of the cone or draw a spiral strip with a pencil, along which we will glue “pine needles” and sweet decorations. As for sweets, here are some tips. It is better to take sweets packaged in bright bell-shaped wrappers (with a single tail on top). These candies often come with wafer topping. That is, they are large enough not to get lost among the tinsel, but they are light and will not come off under the weight of their weight. Apply glue or double-sided tape to the stripes drawn with a pencil. As we remember, the edge of the tinsel is already attached to the top of the cone. We wrap it around the entire surface of the frame. Now we glue candy onto the tails. It is advisable to place them in a checkerboard pattern. That's it, the Christmas tree made of sweets and tinsel is ready!

Small tree for a child
This primitive construction made of thick paper can be made very beautiful. Based on the child’s tastes, it is better to use lollipops, marmalades and caramels rather than chocolate candies. It is very convenient to insert cockerels, squirrels and stars from melted sugar with wooden sticks into the foam frame. Children also love chocolate figurines (angels and animals), which are sold in stores. They usually already have strings for hanging them on real Christmas trees. If you use small candies and caramels, then you need to take a “rain” with a shorter pile so that the candies do not get lost behind the fluffy tinsel. You can also involve a child in the manufacturing process. But then it is better to use double-sided tape rather than glue. A DIY candy tree will make the New Year more memorable for your child.

marmalade tree
Now let’s consider such real-life cases when the tools for cutting out the frame and gluing tinsel may simply not be at hand. Don’t give up celebrating the New Year on this occasion! Marmalade is an excellent building material. How to make a Christmas tree from jelly candies? Very simple. We begin to build our New Year's tree right on a wide flat plate. We lay out the marmalades (preferably green) so that the entire structure resembles a cone or pyramid. Sprinkling sugar on the candies makes our Christmas tree look like it’s been dusted with frost. Our toys will be chocolate dragees "M&M" or "Sea Pebbles". And the tinsel is melted chocolate or caramel. This rain, by the way, will also hold parts of the structure together. The only disadvantage of such a Christmas tree is its short shelf life. It is advisable to eat the tree on New Year's Eve as a dessert.

To make it from consumables, you only need adhesive tape. Let's prepare a bottle of champagne and about 35-40 chocolates. It is advisable that they be wrapped in green and with two tails. We begin to attach the candies with tape to the bottom of the bottle. If you have the opportunity, use long sweets first. After all, a real Christmas tree has lower branches that are longer than the upper ones. Then, at a slight distance from the first circle of candies, we attach the second layer. We hook one tail to the tape and stick it onto the bottle. Place the candies in a checkerboard pattern, that is, the top row should cover the gaps in the bottom. We do this until we come to the metal bridle that holds the plug. Thanks to the gold or silver foil covering the champagne bottle, you don’t have to decorate the top - a Christmas tree made of candies is already quite elegant. You can take such a tree with you to the New Year’s celebration in the main square of the city and uncork it there as the clock strikes. Don't forget to grab some wine glasses. And you already have a drink and a snack!

Christmas tree on a foam base
Having worked once, you will have a New Year's tree for many years. You just need to hang new sweet “toys” every year. Cut a cone from a piece of foam plastic. We cover it with green wrapping paper on top. We take bright satin ribbons and tie small multi-colored bows. Cut out squares from green organza. Using glue (it will be easier to use a heat gun), we attach the decorations with sweets to the foam plastic frame. The Christmas tree made of sweets and tinsel is ready. In this case, it is better to take sweets in a wrapper from which they can be easily removed without tearing the wrapper off the base. As additional decor, you can use beads and regular Christmas tree rain.

Christmas tree in five minutes
We tie three candies by the ends with thread. We attach them to the top of the champagne bottle using tape. The untied ends of the candies will be positioned like the top three branches of a Christmas tree. Unwind the tape. We attach the candies to it at one end of the wrapper. It turns out to be such a garland. To make a candy tree look beautiful, you need to take single-sized sweets. We wrap this garland of tape around a bottle of champagne in a spiral, moving from top to bottom. Additionally, we decorate with short-pile rain, bows and other New Year's tinsel.
Some decor ideas
If we have decided that our home will be decorated with a Christmas tree made of candies, then the accessories for it should also, if possible, be edible. Use candy cane stars instead of a top. And let the serpentine be replaced by multi-colored jelly laces (sold in stores from the Haribo company, for example). The foam frame is convenient for not gluing, but pinning decorations to it. You can attach candies to it with regular toothpicks. Sweets do not have to be in green wrappers. You just need to skillfully combine colors so that it doesn’t look tacky, but stylish and elegant. A DIY candy tree is not only beautiful, but also delicious. For the holiday, it is better to buy expensive chocolate varieties of sweets.
© DepositphotosHe'll tell you how to make a Christmas tree out of candy. tochka.net- the poems turned out just right! And all because the New Year's time is simply gushing with creativity, ideas and festive mood! So, how to make a Christmas tree from candies - a kind of elegant and sweet tree that will especially delight children and sweet-toothed adults? See useful and simple tips with photos in our article.
Of course, one of the main and unchanging attributes is the Christmas tree. If for some reason you don’t have a real New Year’s beauty, we’ll tell you how to make a Christmas tree out of candies so that the holiday can still take place.
Such a creative Christmas tree can be placed on your table, decorating your home or workplace, or you can give it to friends, and not only those who have children. After all, many adults have a great passion for sweets.
- How to make a Christmas tree from tinsel candies on a foam base

How to make a Christmas tree from champagne and sweets with your own hands, photo © Depositphotos
To create such a tree you will need a piece of foam plastic, green paper, satin ribbons, a piece of green organza, double-sided tape, a hot glue gun and candy.
Cut a cone out of foam plastic and use double-sided tape to cover it with green paper on the sides and bottom. Tie the desired number of bows from satin ribbons, and cut out squares from organza, and together with the sweets, attach them to the cone using a glue gun.

How to make a Christmas tree from candies with your own hands, photo © etsy.com
For these purposes, it is better to take round-shaped candies in multi-colored shiny foil wrappers with convenient tips so that they can be easily removed from the wrapper without removing them from the tree. A Christmas tree made from identical and preferably expensive candies looks very elegant and stylish. You can also decorate the candy tree with rain, beads, and use bows and other decorations for the top.
- How to make a Christmas tree from candies - jelly serpentine

It is much easier to work with jelly sweets than with wrapped candies. Using toothpicks, they can be easily attached to the cardboard base. To prevent such a Christmas tree from falling on its side, stuff tight lumps of paper inside the cardboard cone. It is better to arrange the jellies in the form of serpentine and spirals - such a Christmas tree will look colorful and cheerful.
- How to make a Christmas tree from candies and wooden planks

How to make a Christmas tree from candies with your own hands © Depositphotos
If your boyfriend (or husband) is not devoid of skillful hands, imagination and a good mood, then building such a creative Christmas tree from wooden blocks mounted on a thin iron pole will not be difficult. Look how organically and brightly the multi-colored candies look against a green background. And after use, such a New Year's tree can easily be folded up until next year.
- How to make a Christmas tree from candies - marmalade slices

How to make a Christmas tree from candies with your own hands © Depositphotos
If you wish, you can make a candy tree right on the plate. For this you will need marmalade slices, preferably green for credibility, and a handful of multi-colored dragees. Here you don’t even need to attach anything - just lay out a Christmas tree figurine from marmalades, as shown in the photo, scatter colored balls on it, make a stem, and in two minutes the New Year’s beauty is ready.
- How to make a Christmas tree from candies - scattered assortment

How to make a Christmas tree from candies with your own hands © Depositphotos
And, perhaps, the simplest and fastest version of a sweet Christmas tree is an impromptu scattering of candies right on the table - such a treat on the desktop will sweeten the life of a colleague, will delight a child beyond words, or will pleasantly surprise a loved one on a tray in the morning with a cup of coffee in bed.
READ ALSO:
Watch an exclusive video from tochka.net on how to make paper snowflakes with your own hands:
See all the brightest and most interesting news on the main page of the women's portaltochka.net
If you notice an error, select the required text and press Ctrl+Enter to report it to the editors.
Useful tips
For the New Year, you can surprise your friends and family by giving them a beautiful handmade gift.
Since the Christmas tree is one of the main symbols of the New Year, it is ideal as a gift.
You can make just a beautiful Christmas tree, or you can decorate it with candies, so you get not just a decoration, but a useful element of the New Year's sweet table.
On our website you will also find:
Here are some of the most interesting ways to make a Christmas tree from candies with your own hands:
Christmas tree made of candies and bottles of champagne

You will need:
Empty bottle of champagne or wine
Scissors
Lots of small candies
Bright ribbon.
1. Place a piece of tape on each candy.
2. Start sticking the candies to the bottle using tape, starting at the bottom and working your way up to the neck of the bottle.
*Make sure that one end of the candy touches the end of the adjacent candy.
3. Glue each next row slightly higher than the previous one so that the candies overlap each other - this will make the tree more magnificent.
4. There should not be more than 4 candies on the top of the head. You can also add a bow or tape a star on it.
5. Pull the curled ribbon down from the top of the tree.
Christmas tree made of sweets and tinsel (master class)

You will need:
Double-sided tape
Regular tape
Small candies
Cardboard and scissors (for making a cone)

1. Using simple tape, glue candies to the cone, leaving small spaces between the rows of candies for tinsel.
2. Place double-sided tape in the gaps between the rows of candies and begin gluing tinsel to it.
3. Glue 3-4 candies to the top of the cone and also wrap them with tinsel.
DIY golden Christmas tree made from candies (photo instructions)

You will need:
Cardboard and scissors (to create a cone)
Double-sided tape or glue (PVA or hot glue)
Candies wrapped in gold foil (other candies if desired)
Beads on a string.
1. Cut out part of a circle from cardboard, twist it to form a cone, and secure the ends with glue.

2. Using double-sided tape or glue, begin gluing (from bottom to top) the golden candies to the cone. They should fit closely together to hide as many empty spaces as possible.


3. The gaps between the candies can be covered with beautiful beads on a string or tinsel of a suitable color.

4. You can make a star, and, if necessary, paint it or cover it with foil. You can add a bow.

DIY chocolate candy tree (master class)

You will need:
Thick cardboard and scissors (to create a cone)
Glue (PVA or hot glue) or tape
Scissors
Chocolates (truffles) in shiny wrapper.

1. Roll a cone out of cardboard and secure the ends. Cut off any excess so that the cone sits evenly on the table.
2. Using tape or glue, begin gluing the candies to the cone. Cover the entire surface of the cone with candy.

3. Start decorating the tree to your liking. You can use beads, tinsel, bows, ribbons, “rain”, and you can attach a star made of paper or foil to the top of the head.
How to make a Christmas tree from soft candies

You will need:
Foam cone
Lots of soft (jelly) candies of different colors
Toothpicks.

Use toothpicks to attach the candies to the cone.

You don't have to use the whole toothpick - you can break it into two pieces.
Simply insert one end of the toothpick into the candy and the other end into the cone and fill the entire tree with candy.
How to make a gift tree from candies with your own hands

You will need:
Several candies
Green cardboard
Scissors
Red ribbon
PVA glue.
Text instructions after the video.
1. Cut a strip of green cardboard measuring 25 cm x 5 cm.
2. Divide this strip into three parts, which will then need to be bent - make marks for future folds at 8 cm, 16 cm and 24 cm.
Also divide this strip in half lengthwise.
3. Fold the strip in half lengthwise, apply PVA glue to one half and glue both halves together.
4. Using the marks made in step 2, fold the strip into a triangle. You have now created a frame for your future candy packaging in the shape of a green Christmas tree.
5. We make shelves for candies inside the packaging:
5.1. Prepare a strip of paper measuring 25 cm x 5 cm, and make marks on it every 2.5 cm (i.e. 2.5 cm, 5 cm, 7.5 cm, etc.).
5.2. Cut the strip in half lengthwise.
5.3. Cut one of the halves in half crosswise at the 10 cm mark.
You will have 3 stripes: 10 cm, 15 cm and 25 cm.
5.4. Fold each strip as shown in the image (zigzag) to create several triangles.
6. Insert your shelves inside the frame (Christmas tree): the long strip is folded into shelves for the bottom row, the middle one for the middle row and the small one is folded into a triangle and inserted into the top of the “Christmas tree”.
7. Start inserting candies into the cells of your Christmas tree.
8. Take a ribbon 45 cm long and tie it to the Christmas tree.
If you wish, you can make a trunk for your Christmas tree out of brown cardboard. You can also put sweets in it (see video). It can be glued using double-sided tape.
*You can decorate the Christmas tree as you like.
A simple candy tree (step by step photo)

You will need:
Paper cone
Corrugated paper
Candies
Decorations to taste (ribbon, beads, artificial flowers, Christmas tree decorations).


The height of our Christmas tree turned out to be 35 cm, enough to make it the main accent of the center of the table, and also to present it as a gift to your friends. To make it, we will need a sheet of Whatman paper, a ruler and a pencil, a glue gun and a stapler, as well as delicious wrapped chocolates. For this master class we will need truffle sweets with a golden wrapper without tails, for example, you can buy “Autumn Waltz”, you will need about one and a half kilograms. If you bought gold-wrapped candies, you will also need gold spray paint. An additional decoration for your Christmas tree will be the “Star” tip, which you can make yourself using the origami technique using thick paper, and you can also decorate it with low plastic beads, which should match your “Star”, because we want to make a stylish decorative element, tastefully done.
Or you can make a green Christmas tree by choosing the appropriate wrapper, and additionally decorate it with tinsel with a small pile.
DIY candy tree performed on a cardboard cone-shaped base, which you can make yourself. You can also buy a foam “cone” base at a craft store or make it from a plastic bottle, but then the height of the base will be small. A sheet of whatman paper allows you to make such a base of any size.
To Christmas tree made from candies It turned out to be 35 cm in height, whatman paper needs to be cut in half. You can put one half aside for now; you will need it for other crafts. On the second part you need to draw half a circle, its radius should be equal to the desired height of the tree, in this case the radius of the semicircle will be equal to 35 cm. We carefully cut out the workpiece with stationery scissors and cut it in half. From one such semicircle the result will be two cones and two original Christmas trees.

We glue the edges with a hot gun and hold them a little with our fingers so that they adhere, and from below we additionally fix the edges using a stapler. You also need to cut out a circle from the cardboard - the bottom for the cone. To secure the bottom, its radius must be one and a half centimeters larger than the lower radius. Cuts need to be made along the larger circumference to create a thick fringe. The fringe needs to be folded and the bottom glued.

Various homemade accessories will help decorate your home on the eve of the New Year holidays, because the decoration of the house must be bright, one might say magical, and DIY candy tree will become part of a unique holiday decor. Chocolates and wrapping are materials that can be found in every home in winter, so at any time you can start creating, guided by our master class.
Of course, such a craft will not be durable, because the candies will melt in a warm room, so they must be eaten. You can use a trick and decorate with a “dummy”; for this you can collect chocolate wrappers, roll up candy wrappers, and put a wad of paper inside.
DIY candy tree
Will be a lush decoration for your home DIY candy tree, master class The production of which is very simple and accessible, so even a beginner can cope with the task. You can give such a cute handmade souvenir to a close friend for the New Year or decorate your desk with it if your office doesn’t have room for an elegant lush tree.
For production, you can use a variety of materials: different types of paper and textiles, other available materials and exclusive techniques. But we will turn to the simplest and most accessible materials, which are definitely available in every home for the New Year, because New Year’s gifts are not complete without sweets.
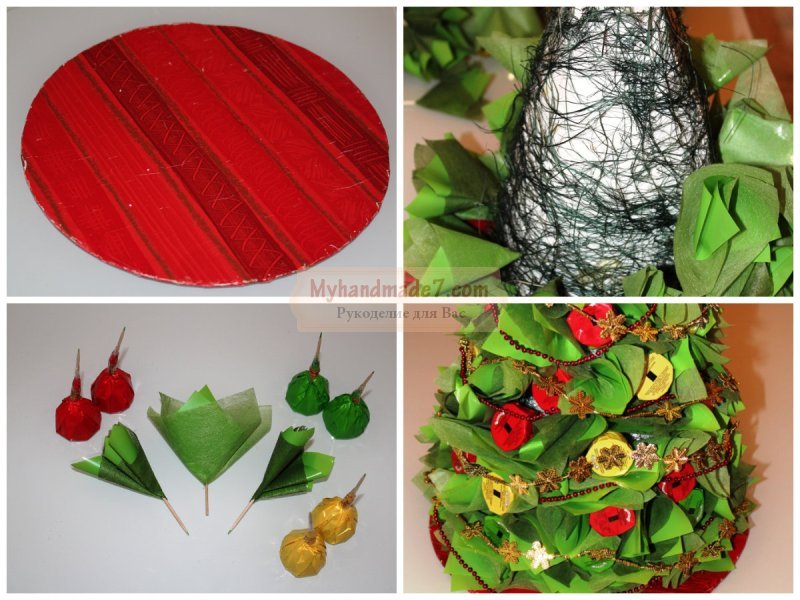
For this craft, we will use a cone-shaped foam blank, which can be purchased at a store that sells various craft supplies. If you have such a base, then you can attach all the elements to it using a toothpick, but you can also make a cone-shaped base from thick paper, and fill the cavity with scraps of paper. To make the cone stable, be sure to glue a cardboard circle at the bottom, the diameter of which coincides with the diameter of the cone.
During the work we will need glue, toothpicks, and tape. The main decorative elements will be chocolates, but to make the Christmas tree fluffy, we will add pieces of wrapping paper in green shades. The finished Christmas tree must be decorated with garlands of beads and a spade star.

You can make a foam cone yourself if you have any leftover pieces of foam from packaging household appliances or after construction work. Several small foam pieces can be glued together, and then the workpiece can be given the desired shape with a utility knife. The base does not need a perfectly flat and smooth surface, because all of it will be decorated with paper and candies.
You should choose small candies packed in foil. Wrapping paper must be cut into squares. All prepared squares should be connected in pairs, and each workpiece should be folded four times, and a toothpick should be glued to the center of the workpiece. As a result, you have a voluminous blank, which will be the main decoration of our New Year's beauty. You can use several shades of green to decorate your Christmas tree. Such blanks will completely cover our base, and candies can be fixed between them.

Be sure to choose chocolate products in bright wrappers that will stand out among the green “pine needles” like Christmas tree balls. A toothpick must be attached to each candy; however, you cannot insert it directly into the chocolate. The candies themselves can also be wrapped in wrapping paper to make it easier to decorate our foam base with such elements.
When all the elements are ready, you can decorate them by inserting toothpicks into the base one by one, forming a lush crown. The finished Christmas tree must be decorated with a garland, and a star attached to the top of the head with a toothpick.
If you want to give such a craft as a gift, be sure to wrap it in transparent packaging film and tie a big red bow on top.

How to make a Christmas tree from candies with your own hands
Who said that sweets are, if you have an unusual idea, how to make a Christmas tree from candies with your own hands, then you can surprise any adult with your gift. It is not at all necessary to make the base for the souvenir with your own hands - from foam plastic or paper, because you can use a bottle of champagne as the base. Get an unsurpassed DIY New Year's gift for a friend 2 in 1 - both a fizzy drink and delicious chocolate.
To make the New Year's beauty look lush and bright, in addition to candies, you need to use bright paper, packaging mesh for flowers, Christmas tree tinsel and other decorative elements to decorate it. Despite the fact that the candies themselves in bright wrappers play the role of Christmas tree balls, you can add decorative Christmas tree decorations and boxes. The main thing is that the craft is done with taste, and you will find several possible ideas for bottle design in our step-by-step master class.

DIY Christmas tree made of tinsel and candies It is always done in layers: first a layer of tinsel is glued to the base with tape, then a row of chocolates, moving from the very bottom until the entire base is covered.
Publications on the topic
-
 Should you be upset about small breasts and a large nose (9 photos) Humped nose
Not loving yourself is a sin! © Thinkstock The ability to find flaws in your body is an international trait. Even universally recognized beauties...
-
 What attracts women in a man's body What attracts in a woman's body
1. Line V I can't say why this particular part is so attractive to us. Two prominent muscles that lie above...