
Craft a hat from threads. How to make a cute Christmas hat from threads? DIY thread hat

And we continue active preparations for the upcoming favorite holiday, the New Year! And this time we bring to your attention an original version of a New Year's tree toy in the form of a winter hat.
Making such Christmas tree decorations with your own hands is very simple, and besides, you don’t need any supernatural materials to make them.
Thread hat
DIY Christmas tree toy Hat

To create a New Year's toy, Thread Hat, you will need the following materials: brightly colored knitting threads, a cardboard toilet paper roll, scissors.
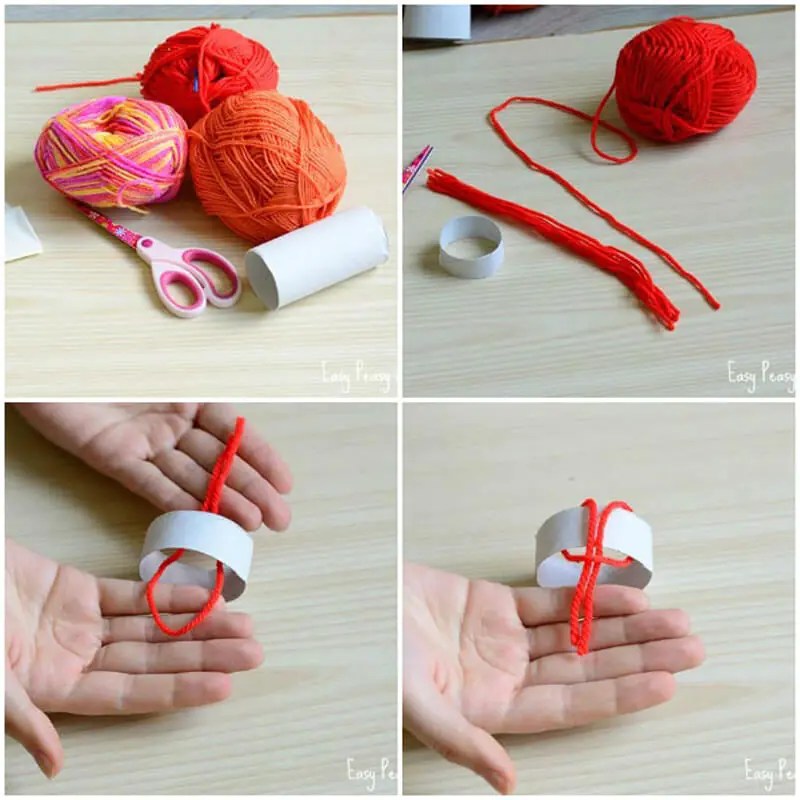
Cut a piece about 2 cm wide from the cardboard tube. Now cut the threads into pieces of about 16 cm and start tying them on a cardboard strip (see photo). The more pieces of thread you tie, the more voluminous and neat the Christmas tree toy will look.
You can use threads of the same color or opposite threads of different colors and textures, thereby creating different patterns.

Now gather all the threads together and thread them inside, as if turning them inside out. Tie the threads at the top so that there are threads left to create a fluffy pompom.
Place a little cotton wool or a piece of padding polyester inside the hat so that the hat holds its shape.

Use scissors to trim the pompom.

Now tie a loop to the finished hat and hang it on the Christmas tree.
These thread hats can be used to decorate not only the New Year tree, but also greeting cards, gifts, clothes and accessories.

You can also make a hat without a pompom. To do this, tie the threads before turning the cap inside out.
As an option, a miniature hat made of threads can be decorated with a pompom made from other materials. For example, it could be a piece of cotton wool, a foam ball, large beads, buttons, etc.

Hello, dear readers! As the New Year holidays approach, many begin to think about home decor, in particular decorating the Christmas tree. Earlier we already told you how to make a wide variety of decorations for the green spiky beauty, but today we will tell you how to make a hat from threads for a Christmas tree. At first glance, this element seems to be knitted, but in fact, everything is far from it! All the secrets of creating such an incredibly cute cap pendant will be revealed later in the review.
This is the kind of hat we will end up with.
Thread hat: master class.
To work you will need:
- A roll of paper towels or toilet paper.
- Scissors and stationery knife.
- Threads (floss or yarn).
Stages of creating a hat.
We take a paper towel roll (we used a foil roll) and use a utility knife to cut it into rings 8-10 mm wide. Accordingly, how many hats you want to get in the end, so many rings should be prepared.
We cut the threads into pieces 15 cm long. It’s difficult to predict their total number at this stage, so don’t cut too much; if there’s not enough, you’ll cut more.
Take the first thread and fold it in half.
In this folded form, we pass the thread through the ring from the sleeve.
Then we thread the two free ends through the loop.
Tighten the thread.
We create a similar loop nearby and also tighten the thread. We move this thread tightly to the previous one.
According to the above scheme, we cover the entire ring with loops of thread.
And you pass them all together through the ring, as if turning them inside out.
Align all the threads with your fingers - place them in a column up.
We cut a thread about 15 cm long, fold it in half, and wrap it around all the upper threads, stepping back from the edge a little more than 1 cm (adjust as you wish). Tighten the loop, draw the loose ends around, and tie it into a knot. We cut off the excess threads with scissors.
We lay the hat on the table, smooth out the protruding ends, and cut it in a semicircle. If the pompom seems long, cut it some more.
Below the pompom we tie a string to the pendant.
And here is the result!
A hat made of threads on a Christmas tree will look simply magical; your guests will not even guess that this product is not knitted at all! Such cute little things make New Year's decor more cozy, warm and homey! Be sure to make such wonderful mini-hats, you will be very pleased with the result.
You can always make wonderful New Year's toys with your own hands. For example, a beautiful toy for the New Year tree in the form of a hat made of threads.

With the arrival of winter, you should stock up on interesting homemade crafts, because preparations for the main holiday - the New Year - begin. That's why we decided to make creative thread hats for you. They can be used as decorations on a Christmas tree, on a bottle of champagne, or simply put on a little snowman, which you can also make with your own hands. It will also be a wonderful souvenir for family and friends!
All we need is:
- Knitting thread
- Scissors
- Cardboard
First, choose the size of your hat. For small hats, a 15 cm strip of cardboard, approximately 2-3 cm wide, is suitable. I made them small, taking a 10 cm strip of cardboard. Then glue the edges of the strip together, making a circle.

Choose yarn of your favorite color and make blanks 20-25 cm long. Fold the thread in half and place a loop inside our circle. Then wrap the tails of the thread into a loop and tighten.

Do this with each thread until the cardboard is completely closed. Then turn the ponytails inward and secure with a thread. The hat is ready! To make it more beautiful, decorate it with rhinestones or buttons.
Good luck in your creativity and a bright New Year's mood!
A mini hat made of thread is a simple craft that even a small child can make. Naturally, under the strict guidance of an adult. You can give this toy as a gift to a loved one or decorate a fluffy New Year tree with it.
By the way! To make the first such craft, you will need about 40-60 minutes. But after you master this simple process, the work will go much faster. Experienced craftswomen take no more than 20-30 minutes to make one small hat from threads. Thus, with a certain skill, in 3-4 hours you can make similar decorations for the entire Christmas tree.
Imagine that your New Year's tree will not just be festive and bright, but cozy and homely beautiful. DIY toys have become incredibly popular lately. And this is not surprising. Made in the same style, they make the Christmas tree a real decoration of any interior. And how many emotions the process of making New Year's toys gives!

Materials
To make a decorative toy hat, you will need:
- threads for knitting, preferably wool;
- cardboard sleeve (you can use a toilet paper or foil roll);
- double-sided tape and scissors;
- small pompom, beads, tinsel or buttons (optional).
By the way! To make the hat neat, the threads should be thick, high-quality, and convenient for work. The denser the thread, the larger the toy will be.

Step-by-step manufacturing process
Remember! Careful work without haste or fuss is the key to a beautiful craft. It is important to follow the proposed sequence of manufacturing steps. Then the work and its results will give you great pleasure. So…
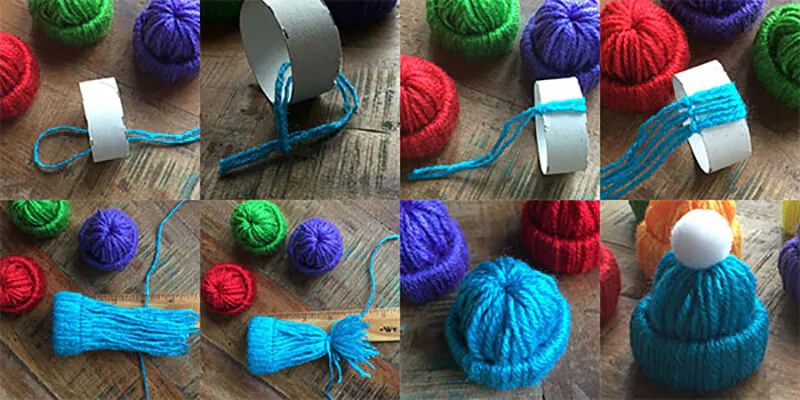
- First of all, cut a small ring from the cardboard sleeve. Its width in this version should not exceed 1.5-2 centimeters, but depends on the desired size of the future craft. This ring is the basis of a small hat. This is what will hold the threads. Thanks to the ring, the toy will retain its shape even if we hang it on the Christmas tree.
- Next we will work with threads. The skein must be cut into pieces of equal length (about 30 centimeters). It is quite difficult to calculate the number of pieces that will be needed for the craft in advance. Their number depends on how tight the knitting is on your toy.
- The most crucial moment - securing the first thread to the cardboard rim. To do this, we place the thread under the ring, forming a loop. Then we pull the ends of the thread through the loop and carefully, without pressing (otherwise you can wrinkle the cardboard), tighten it.
- This work must be repeated with the remaining threads. It is important to place the segments tightly to each other so that there are no free areas on the ring.
- When everything is ready, the upper part of the cap must be tied with one of the remaining pieces. Make sure the knot is strong(otherwise it may come untied; it will be quite difficult to correct this incident in the finished work).
- The excess ends of the threads must be cut off, leaving a “tail” no more than 1.5 centimeters long.
- Next, turn the almost finished hat right side out. Using a needle, we thread one thread-loop in order to hang the toy on the Christmas tree in the future. Then we put the hat aside: you need to make a pompom.

A variety of materials are suitable for the bubo:
- bright tinsel (in this case the craft will be shiny and elegant);
- a piece of cotton wool (it perfectly imitates a snowball, and therefore this hat looks especially winter-y);
- beads, buttons;
- remnants of thread, felt of the same shade as the craft itself.
Glue the finished pompom to the toy using double-sided tape. All! The craft is ready to decorate fir branches.
The proposed option for making a cap is not the only one. Today many varieties have been invented.
For example, you don't have to sew on a pompom. In this case, the shape of the hat will be more rounded. And in order for the shape to last better and longer, you can place a ball of crumpled paper inside the craft. It must first be wrapped with threads of the same color as the toy.
The size of the craft can be any. The wider the ring and the longer the segments, the larger the finished hat.

To make a craft, you don’t have to run to the store and buy new threads. You can use any leftovers from past knitting projects..
By the way! Try combining threads of different colors in one craft. The result will definitely please you: the hat will turn out bright and bold, or gentle and calm. Its “tonality” depends on the chosen color scheme.
We advise you to decorate the Christmas tree exclusively with colored hats, without using other toys. In this form, the forest beauty looks stylish and original. Hats can be different in color and size, with or without pom-poms, in a word, the way you see them. Don’t be afraid to show your imagination, because the New Year is a holiday imbued with miracles.
Charming decorative little hats that resemble touching children's things are very useful for the winter holidays, and can be used for interior decoration, a small gift or even a Christmas tree decoration. The process of making such a cap can be mastered quite quickly, and can even be used for labor lessons.
For work we will prepare: a round plastic bottle, bright yarn, scissors, decorative elements (rhinestones, beads, buttons, etc.).


We cut the plastic bottle in a circle, we get a closed ring. The width of the plastic strip is 1 cm. If the bottle is of large diameter (1.5 - 2 liter capacity), then the ring needs to be cut into two identical semicircles, which are connected into a ring and the ends are secured with tape to obtain a circle of smaller diameter.


We select bright yarn from skeins of thread that you have left over from previous projects, which were lying idle, and might not be needed at all. Yarn can be used in different thicknesses and textures: thin, thick, boucle, sectionally dyed, you can use threads after unraveling things, even if they are not whole.


We cut the thread into equal fragments, each piece should be 15 - 20 cm. Then we fold it in half, thread a loop through the plastic ring and tighten the thread.


If the threads are thin, then we use not one thread, but a whole strand. In the same way, we collect threads around the entire circumference of the ring, placing them tightly to each other.


We get a ring with attached threads. Then we collect the threads into a bundle and push it inside the ring, straightening the ends. The bottom of the hat is ready.


We form a pompom. To do this, we tie the ends of the threads with additional thread, pull them tightly and cut off the ends. We cut off the threads that come out of the pompom, getting a round fluff on the top of the hat.


If the length of the yarn fragments turns out to be shorter than 20 cm, then the hat will turn out to be single-layer; for the pompom, you do not need to tuck the threads inside the ring, just tie the threads in a knot. We use threads of different colors to make the hat more elegant.
Publications on the topic
-
 The Blessing and Curse of People with Phenomenal Memory
Today we’ll talk about famous personalities whose names remain forever in the memory of generations, and whose actions and discoveries changed the world and the course of history....
-
 Who is hiding the true history of humanity?
The MIYuFA website www.site and its board differs from other Russian sites in that articles always appear on it about what others are talking about...