
What to make of wire for the new year. Christmas crafts from chenille wire

Decorating a home for the New Year is often associated with something costly and time consuming. But there is another way - to remember about hygge, simplicity and comfort. Today I want to propose a very quick New Year's decor inspired by minimalism and Scandinavia.
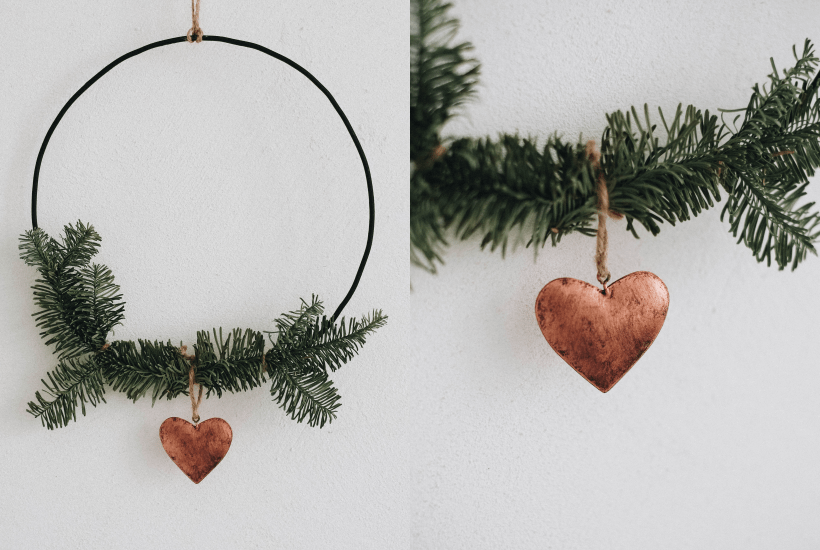
Sometimes all we need is wire and some spruce branches. But even in such a simple decor, there is where to apply imagination. After all, you can hang any decorations on the branches: from copper stars to your favorite New Year's toys from childhood.
Wire jewelry - materials and tools
Time taken - 30 minutes. We will need:
- single-core aluminum cable - about 3 meters
- pliers
- wire cutters
- black acrylic
- paint brush
- fir branches
- hot melt or moment
- secateurs
- linen twine
- Christmas decorations to taste.
DIY wire jewelry - work progress
To make this Scandinavian style Christmas wire decor, I used a medium hard aluminum cable. It should bend well, but at the same time keep its shape. Usually, the cable is black or white. You can paint it any color with acrylic paint.
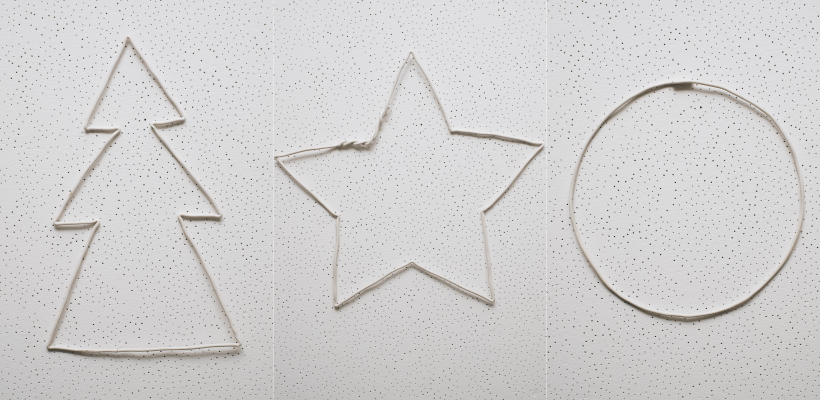
Decorations in the shape of a herringbone and a star took 110 cm of wire, everything else went to the ball.
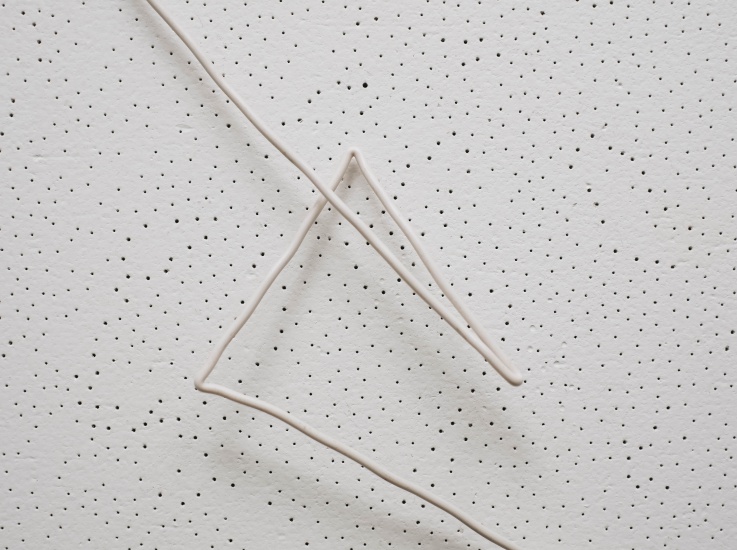
1. It may seem that you just need to form a piece of jewelry with wire, but there is one secret. In order for the decor to be of the correct shape and look complete, each corner must be clamped with pliers.
To do this, you simply fold the wire in half and squeeze. And so with every corner. Only then can the decoration be formed.


In order to make it easier to repeat the shape of a Christmas tree or a star, you can print them on a sheet of paper and lay them out on a stencil. Use a plate or saucer for the ball.
2. If the junction of the ends of the wire is on the side where the spruce branches will be, you can simply twist them. If it doesn't work out, like in my Christmas tree, just cut off the excess wire and glue the ends with hot melt glue or transparent Moment.
3. We paint the blanks with acrylic in black or any color that better suits your interior and mood. To dry the paint faster, dry it with a hairdryer.

4. Cut off small spruce twigs with a secateurs and tie them to New Year's wire decorations with linen twine. Can be glued with hot melt glue.
5. Add decor to taste and hang.

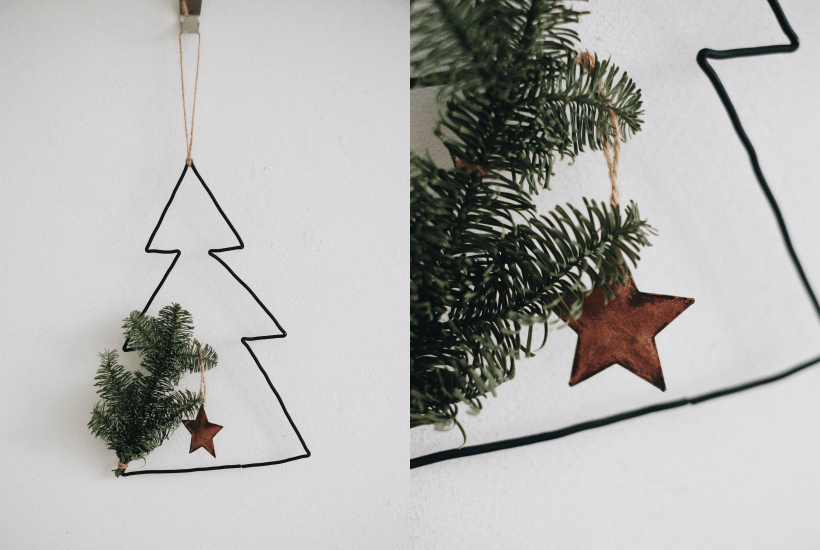

Just 30 minutes, 5 simple steps - and your DIY Christmas decorations made of wire are ready!
Best,
You can make a Christmas tree out of wire with your own hands in just a few minutes. This is a fairly simple craft that will fit well into the interior of your home or office.
Moreover, it can be of different sizes - both desktop and floor. And also such a toy can be used as a decoration on the main Christmas tree at home.
In the simplest case, to create such an original Christmas tree, in addition to the wire itself, you only need garlands, a crown, scotch tape and scissors. The idea is very simple:
We take a sufficiently strong wire and bend it into a spiral, constantly decreasing the width of each subsequent turn. In this case, the lower turn should have the shape of a full circle - you will need to fasten the ends of the thick wire with a rope or thinner wire.

When we get to the last tier, leave the tip of the wire pointing up (it should be located exactly in the center) - this will be the crown.

Now let's align the wire at all ends. It is necessary to ensure that all the contours are even, and the first turn is also flat - the structure must stand confidently on the floor, table or any other surface.
We fasten the garland along the turns with transparent tape. The pieces of tape should be small enough to be invisible.
We put on the top of the head. You can also hang other toys by hooking them over the light bulbs.
So it turned out so simple and at the same time. According to this principle, you can make a New Year's beauty of any size - from very small (desktop version) to literally huge (in an apartment or office).

You can see the whole manufacturing process in practice. As a matter of fact, the described principle is the main one - it can be used to make any Christmas tree out of wire.
To some, such a model will seem too "naked", empty. This flaw can be corrected in 5 minutes. To do this, it is enough to attach tinsel along the turns, and also hang balls and other New Year's toys.

The wire can also be run in a different pattern - for example, in the form of a coil, as in the bathroom.

It is also decorated with tinsel, garlands, toys. If you make it small, you get a Christmas tree toy, and if it is large, you can fix it on the wall and decorate it to your liking.

You can also make a Christmas tree from two turns of wire, which will go in opposite directions - one twists to the right, the other to the left. This is a very interesting option, since such a Christmas tree looks symmetrical and certainly does not look "naked".
DIY miniature Christmas tree made of wire for an apartment and an office
This version of the craft is perfect as a toy for a large, so to speak, main Christmas tree in an apartment or office. The principle of its manufacture is slightly different.
First, we take the main wire and make a contour out of it, and from above we do not forget to form a small loop for hanging. Then we take a smaller wire (preferably light shades) and put on small beads, beads and other decorative elements. And then we fill it with coils inside the space in the contour, periodically attaching it to the base.
By the same principle, with your own hands, you can make not only a Christmas tree out of wire, but in general any other toy - the same star, a ball (both flat and voluminous), an icicle, a pine cone, a snowman: unlimited space for imagination. And if you also decorate with a small LED garland, then the craft can be used as a table souvenir at home or at work.

But how great these toys look on the New Year's beauty.

Herringbone with curls made of aluminum wire
And this is a small masterpiece that will perfectly decorate a large Christmas tree in an apartment or at work. To make such a Christmas tree, it is better to take aluminum wire (it has a pleasant silvery shade) so that the toy stands out brightly against the contrast of the needles (artificial or natural).
We will act like this:
- First, we make 4 identical turns. Both ends of them end with a pattern: a large and a small curl.
- Now let's make 4 more of the same parts, but smaller (about 2 times).
- We connect all the patterns together using a thinner white or light gray wire.
- Decorate with small toys and tinsel. Or you can just hang it on a large tree and leave it as it is.

Christmas craft from chenille wire
And this wire is perfect for creating a Christmas tree with your own hands. It is fluffy, quite voluminous, multi-colored and bends easily - in a word, there are all conditions for pleasant creativity.

You can make a model using the same schemes. Or make several blanks with the same spirals and connect them using ordinary wire.

And here is another option for making such a Christmas tree.
In general, you can achieve the fluffiness of a Christmas tree in a variety of ways. For example, make it or even pine. And if you want to make a perfectly fluffy tree, you can make a conical base, wrap it with wire, on which you can attach a lot of tinsel, as well as garlands and Christmas toys.
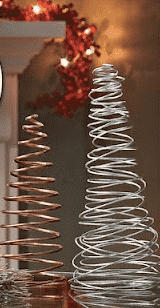
Glamorous wire tree "a la dress" for home and corporate events
And this craft is perfect as a gift for lovely ladies. To make it, we need the wire itself, as well as a pink tape, a glue gun and organza tape (translucent).

We act like this:
First, we wrap the spiral with an ordinary pink ribbon. It also goes in a tight spiral and, if necessary, is additionally fastened with a glue gun. This is a rather painstaking process, but the result is definitely worth it.

We fold the wire into a cone in a spiral - this is what the workpiece is like, and this is how it looks up close. Already interesting.

Now we take a satin ribbon and organza; we measure the same length, which should be 2 times longer than the length of the wire. A thin ribbon is laid exactly in the middle of the organza and stitched.

Gradually, the base is gradually tightened.
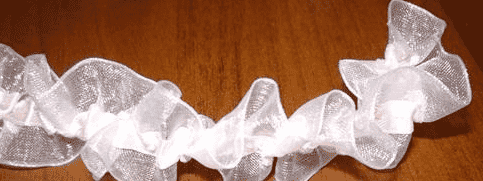
And this is what happens as a result.
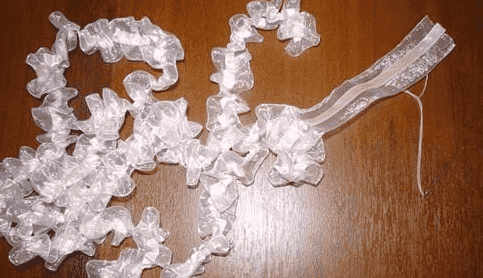
We also glue this linen to the base using a pistol.

Instead of the crown, you can attach a bow - it is more than appropriate here. And we get such a glamorous beauty.
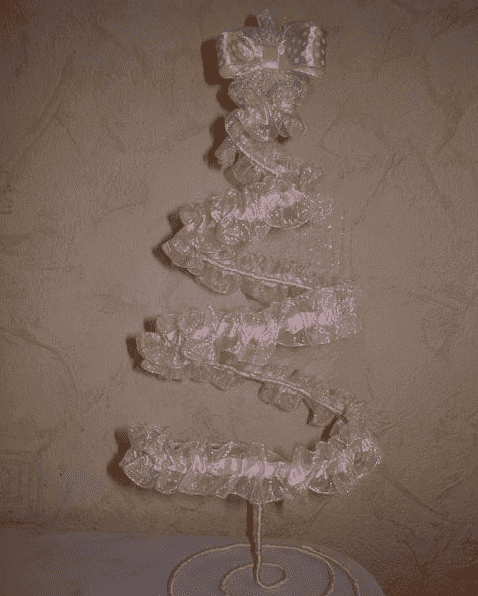
Of course, you can take other colors as a basis - for example, the classic version with any green tint is appropriate. Additionally, a Christmas tree made of wire can be decorated with beads and other decorative elements, attach a garland, hang New Year's toys - again, we will trust our imagination and sense of beauty.

In height, these crafts are about 15-20 cm.A great option for a home or corporate party. And you can also decorate a festive table with such Christmas trees. Just do not forget to highlight them with a small garland - then the effect will be simply magical.

Knitted Christmas tree: how to do it yourself
Why not knit a strip and slide it over the wire? This craft looks much more interesting, and most importantly - more comfortable.

We take a hook, white thick thread and knit a strip of a given size. But first, let's make a wire frame. Of course, in this way you can make both a large and a small Christmas tree. However, a miniature piece will look better as the turns will be much closer together.


Now let's dress up the New Year's beauty with beads, beads or even small Christmas tree decorations. The crown can also be cut from fabric. If you make a loop, this tree can again be hung on a large tree.

Or you can just leave it on the table, light it up with garlands, put tinsel around it, or even put a doll next to it. But the pig is better, because it is she who is.
WITH a holiday!
On the eve of the New Year, everyone begins to fuss, think and fantasize, how to beautifully and festively decorate their home and personal plot. The Christmas tree alone is not enough for people living in the 21st century. I want something interesting, exciting. One of the options to make magic at home is to craft an LED figure. In our article, we will tell you how you can do this as simply and quickly as possible.


New Year's glowing compositions, photo


DIY Christmas street figures with backlight, how you can make ideas

Your home and garden can turn into a magical land if you put in some effort and use your imagination. Whatever idea you have in your head, the procedure for its implementation will always be the same:
- First, you need to think over a sketch of street figures, accurately measure each of its elements in order to purchase the required amount of durolight. It is better to take it always with a margin.
- You make a pattern according to the sketch. This is a regular frame made of wire or any other durable material to which you will attach Durolight.
- We attach Durolight to the finished frame. You can use ordinary clamps for this.
- The last stage is the most difficult - you need to connect the backlight. Use the photo instruction below for this:


Now we will present you some ideas for decorating your infield with glowing figures:
- If you want to decorate a façade or a lamppost, it is best to use LED consoles (made of sturdy aluminum frames). You can make figurines of Christmas decorated Christmas trees and install them on the roof:

- If you don't have a lot of time to decorate the frame with Durolight, then you can use the "Glowing Curtain" garland. For example, balls or the same snowman will look very nice:

- Houses that are simply decorated with a neon cord in the corners look very elegant. At the same time, you do not need to waste time making an aluminum frame, and the decor will turn out to be fabulous:

- If you know how to create figures from ice, then make sure that you can insert non-heating garlands with hermetically mounted diodes inside each figure. They will revive any ice statue:

DIY New Year's glowing deer step by step:

The deer is already a symbol of the New Year, because it is he who carries the sleigh of Santa Claus and stops at every house so that the main character will present the holiday to everyone who is waiting for him with a present. You can make a deer as a decorative element in several ways:
wire
- Prepare a photo or drawing of a deer on paper. This is an important step to help you calculate the correct proportions for your future figure:

- Prepare some stiff wire to make a stable reindeer carcass. It should not bend when finished.
- We wrap the finished frame with thin wire so that you can also decorate the middle of the figure with a garland:

acrylic deer
- First, you need to twist the reindeer frame from a thick wire. The first thing to do is the hind legs, which rise to the abdomen, and from the abdomen to the front legs. From the front legs, the wire extends to the deer's neck, and from the neck to the head. From the head, the wire is pulled along the spine to the hind legs, from which you need to leave another small piece of wire to make the tail:

- We wrap and stuff the resulting frame with polyethylene inside. So that it does not fall off anywhere, you need to wrap it with adhesive tape on top:

- Further, horns are made of wire and attached to the deer's head:


- We wrap the horns with polyethylene and tape according to the same principle as the body:

It will only be necessary to attach a duralight or any garland to the finished figure and you will get a gorgeous glowing deer that will decorate not only your personal plot, but also your home interior.
backlight from duralight
Everything is very simple here, because duralight is the most flexible and plastic backlighting option:
- Sketch the deer on paper.
- Apply duralight to it and make the correct cuts.
- To fix the cut between each other and get a solid figure, you just need to use plastic components - heat it, bend the duralight in the desired position and fix it.

Glowing deer on the window, step by step guide with photos

- Take a deer template, cut it out and hold it against the window to trace. You will have a path to which you attach the LED strip:

- Gently attach one edge of the garland to the selected section of the deer outline, and then circle the whole deer with it, gradually fixing the garland with tape.
DIY glowing balls, ideas with explanations and photos

There are several options for how to make a ball:
- Try to make a uniform and neat ball out of the wire so that it has the same number of edges on which the LED strip will be attached.
- Use fine wire mesh, which is usually used for enclosures or chicken coops.
Let's take a closer look at the last option, because, in our opinion, it is simpler, and the result is more accurate:
- First, prepare the necessary material and tools for work (net, several garlands, pliers with wire cutters and tape measure and gloves):

- Cut a square out of the grid, fold it into an envelope and twist all the parts so that they do not detach from each other:

- The places where the sharpened pieces of the mesh remain must be screwed to the mesh itself so that you do not get hurt during the work:

- Attach a garland to the finished ball, wrapping it around each element of the metal ball:

DIY glowing cubes, step by step with a photo

- Take 6 pieces of plexiglass and sand it.
- Fasten each piece together so that you get a cube, but in the process, gradually glue a neon cord on each side inside the cube. Leave a hole in one corner through which you can pull one end of the cord to connect to the mains or battery.

Glasses can be taken in color and of any size. It all depends on the idea of \ u200b \ u200bthe decor, which you yourself come up with.
Place a glowing snowman on one side of the tree decorated with garlands and a gift box on the other. The box can be made from the cube we described above.
Idea number 2:

Next to the Christmas tree, you can simply make a huge dome ball with a hole for the entrance. You can put a gazebo or just a bench in it to spend wonderful winter evenings there in a romantic setting.
DIY Christmas glowing snowman, step by step with a photo

A glowing snowman can be made not only from duralight, but also in another equally interesting way, using disposable cups:

Make another such structure, place LED garlands inside each, and then fasten them together with a stapler. Decorate the snowman so that it has buttons and a nose. You can use any stationery for this and not only:

We create the magic of the holiday for ourselves, so do not expect pleasant surprises from someone, create them yourself with pleasure! Let our tips and tricks help you out in your everyday life, helping to make your holiday unforgettable!
Video: "LED Shapes"
Lovers of original New Year's decor are invited to a master class demonstrating how to make a snowflake from chenille wire with your own hands.
An uncomplicated Christmas tree toy is attractive not only for its simplicity of manufacture and cheapness, but also for its safety. Such jewelry will not break or cause injury to children. Children can also be involved in this activity, because they are happy to make various crafts for the New Year.
What you need to work
To make one snowflake, prepare:
- two fluffy chenille wires (metallized was used in the master class). If you do not know what it is and how to work with it,;
- a ruler 3 cm wide.

In the process of making a ruler will not be used as a measuring tool. It is needed for the template. Do not forget to do it, because this is the symbol of 2018!
Step by step technique
Twist two fluffy wires together. Do not make the “tail” too large, 3 mm is enough.

Insert the ruler between the fluffy sticks.

Holding the ruler tightly, twist the chenille ends together.

Reinsert the ruler, and then repeat the curl. It is important to alternate the colors of the chenille wire during the manufacture of the snowflake.

Walk the entire length. In this case, you should get eight segments of 3 cm each. This is possible if the length of the fluffy stick is 30 cm. At the end of the work, make a slight twist, securing the segment.

Carefully flatten the snowflake blank - at this stage, again, make sure that the colors of the chenille alternate.

This is how the preparation of the snowflake should look like at this stage of the master class.

Close in a ring. To do this, twist the remaining ends together.

Give your future snowflake a flat look.

It remains to straighten the rays. A fluffy snowflake is ready for the New Year.

This craft is ideal for decorating a Christmas tree. To do this, just fix the thread and hang the toy on the green beauty. Also, a snowfield can serve as a decoration for a festive table. Make a lot of decorations in different colors to get a ready-made set of Christmas decorations.
A master class on creating a New Year's snowflake from chenille wire was prepared specially for the site "Women's Hobbies". Share with your friends on social networks so that they too have time to prepare for the holiday.
Christmas reindeer made of wire and garland. Master classes


Deer number 1

"I blinded him from what was ... la-la-la"
Now everyone is preparing for the New Year and Christmas, and there are many such deer at every step, almost in herds, in every store for sure, and I also saw them in pharmacies. I think you noticed them too. Very cute deer, but honestly the hand does not rise to buy one. I don't even know how much this beautiful curly skein of wire with a garland inside costs. But to do it yourself…. I found this idea interesting. Doing?
Then we need:
1) Any wire, in principle. I had a coil of 0.9 gauge steel wire.
2) Garland. In principle, too, any - ideally if in the color of the wire and with LEDs, then you can freak out with the decor of the deer as you like, in terms of fire safety. In my case, the cheapest Chinese and even green (it needs scotch tape and Metallic paint)
3) Any of the fasteners of the garland to the wire. It can be thinner wire, super glue, tape, thread. I used lurex and occasionally superglue.
We start any work with a sketch. I have such a silhouette of a deer and antlers.

Now you need to try as close to the sketch as possible to complete the silhouette with wire in 2 copies. That is, we should get 2 deer silhouettes and 2 antlers.

We fasten both silhouettes in the area of the muzzle and tail end-to-end, like this.

And along the rest of the perimeter at some distance from each other, like this:

We wind the horns with wire, and we get something that looks like a deer. Now you need to increase the volume. First, we twist the wire around the legs and muzzle:

Owners of the perfect deer-colored garland skip the next step. And the owners of more perverted garlands move on to coloring. Before you paint the garland, you need to close up the bulbs with window tape. I used Metallic spray paint.

Then you need to carefully remove the tape. It is best to cut and tear the tape and gently release the light bulb. I naively tugged at the tape several times, pulling out the light bulbs. Now my deer does not light its horns, alas.
We fix the garland. I started with the horns, attaching the bulbs with lurex and super glue to the wire, wrapping the garland around the horns. The rest of it was pushed into the body and head, a cord with a plug brought out the side of the deer.

We wrap the reindeer with wire in those places where there are large gaps and decorate. But at the expense of the decor, I did not bother too much, wrapped it in lurex (since this is the first thing that came to hand) and a Christmas tree garland in the form of beads. Here's a deer I got.

What can you wrap in general? For these purposes, you can take a thinner wire. If the garland is LED, then you can wrap it with any beautiful threads, or ugly ones, and then spray it with spray paint. The white woolen thread also looks beautiful, the deer turns out to be so shaggy, but it is better not to do this with a Chinese garland. I am sure that you will come up with many more ways to decorate.
Deer number 2

We, of course, by tradition, are waiting for Santa Claus for the New Year. But maybe this time Santa will drop by too? We do not mind)))
And they even made a deer for him. Here's one:
It all started with 2 pieces of old aluminum wire that I found in my closet. You also needed: a skein of gray thread (children's acrylic), white mohair, PVA glue, scotch tape, scissors, pliers.
To begin with, we give the wire the shape we need, connect it at the joints with adhesive tape. We get the following construction:


Now we take the gray threads and, lubricating small pieces with glue, carefully and tightly wind them. Then we twist small parts from wire: tail, ears and horns. I won't show the tail - I forgot to take a picture in the process, but the ears and horns - here:


We wrap the horns with 1 layer of white mohair, and the ears with a layer of gray acrylic. We fasten them together with a thread, and then we tie them, again, with a thread, to the head of our deer. Now we wrap the horns with another layer of mohair.

Cut off excess threads.
The result is such a little belly:
The most interesting thing remains: we randomly wrap a garland on the frame.


Ta-dam!
Deer No. 3


And a little bit of deer contours, maybe they will help you in creating your New Year's Miracle!


Related publications
-
 What to do for a retired woman
Retirement is always stressful for any person, because not only the way of life changes, but also the priorities. Many elderly ...
-
 Congratulations on Victory Day in the Great Patriotic War Super congratulations on Victory Day
To congratulate veterans on Victory Day in the Great Patriotic War, finding the right words is not so easy. It is in our power to convey ...