
Crochet flat dog. Animal scarves

Knitting is back in fashion, and this is not surprising: is it not wonderful when skilled craftswomen, with a thread and a hook, create simply amazing masterpieces? Take, for example, toy dogs, the diagrams and descriptions of which you will find in the article.
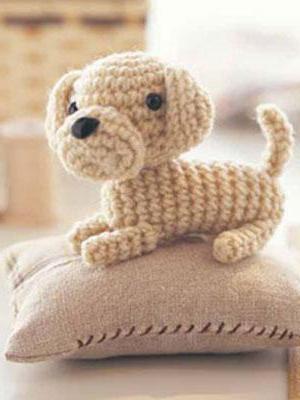
Gentle friend
A homemade toy always has many benefits, ranging from personal preference to the quality of the products included in the composition. This is an excellent solution for allergy sufferers who are highly sensitive to a variety of synthetic odors. In addition, such homemade animals come out several times cheaper than purchased options.
So, today our hero will be knitted which we will analyze in detail. We will pay great attention to all the details, difficulties and peculiarities of the work, so that this lesson is understandable even for beginners.
For work without care

To start the knitting process, you need to prepare the necessary materials. Since this is, first of all, a crocheted doggie (crocheted), the scheme and description of which will be discussed by us later, special attention should be paid to the filler.
Currently, there is a choice on the market, and the variety is so great that you instantly get lost with the right thought. Therefore, you need a determinant in advance of what qualities crocheted dogs with diagrams and descriptions should have.
For example, if you want the product to have relaxing effects, then polystyrene balls are ideal. In another case, synthetic fluff, holofiber and synthetic winterizer will add softness and lightness. And if you strive to create an organically clean toy, then sawdust and shavings will perfectly help you in this matter.
Warm threads
You can also argue for a very long time about yarn. With all its diversity, first of all, be based on your preferences. So, if you do not want the knitted product to be covered with pellets, fluffed and electrified, then yarn with a high content of synthetic fibers is perfect for you. And vice versa, if you need a crocheted dog, the scheme and description of which we will describe a little later, to have an air fluff, then choose mohair or threads with a large percentage of natural wool.
In addition, you should not run to the store for new skeins of yarn before the process of making a toy. Due to the fact that the product is knitted using a special technique, we will need a small amount of thread, scraps and remnants of which will definitely be found in your home.
What is amigurumi

Do not be intimidated by such a name, hearing it for the first time, since the complexity of pronunciation and memorization of the word is not at all justified in practice. So, amigurumi is the Japanese art of crocheting various toys. These can be almost invisible animals, as well as large-scale pillows, hats and other elements containing many details.
Since this is an eastern current, it is accompanied by very cute faces, colors and shapes of toys. In addition, the silhouette of the amigurumi is its main feature, thanks to which it is so recognizable all over the world. Round shapes, slightly bulky heads, a huge amount of tiny details: all this emphasizes the individuality of this style of knitting. Such will be our knitted dogs and the description of which we will consider in detail right now.
A little more necessary
When listing, we did not name all the necessary components that will make up the toy. All additional materials can be found in shops for creativity, handicraft or sewing.
- Hook. In this case, we cannot say for sure what exact size of the hook will suit you. Therefore, its choice is yours, since it directly depends on the thickness of the yarn. In addition, when buying a tool, pay attention to the handle and its connection to the metal part, because this is the main breakdown point, even for a new thing.
- Beads or ready-made eyes to create a muzzle.
- Floss threads. They will also help us add personality to the toy's face.
Special signs
Also, during the manufacture of a crochet dog (with diagrams and descriptions), we will introduce you to special abbreviations that are often used in knitting circles. We will also use them in our work, but for faster understanding and memorization, their decoding will also be nearby.
- KA - amigurumi ring. It is a kind of basis for any toy and is made in just a couple of seconds.
- RLS - single crochet. This is the second most used "pattern" in the amigurumi technique, as it is very small and neat, and the fabric of the finished product looks very solid.
- UB is the usual process of decreasing loops.
- PR is the reverse process of adding loops.
- VP - air loop - the basis of the foundations of any crochet product.
Knitted crochet dogs: diagrams and description of the process

It's time to start making toys. So that everything is clear and there are no questions, we will describe all actions step by step in as much detail as possible. This will not only simplify the process of perceiving information, but also speed up the process of work.
- To begin with, we will knit the upper legs: for this, with threads of the color of the future toy dog, we will make an amigurumi ring (CA) and knit 6 single crochet into it (RLS). Tighten the ring a little to give it a neat shape. Now, in a new row, in each single crochet (RLS), we make two of the same loops: in total, 12 ready-made loops will turn out in a row.
- Now we add every second single crochet (RLS) to get 18 loops in a row. Thus, we gradually increase the handle, then knitting two columns (RLS) in every third element. If you count, then at the end you should get 24 loops.
- Now we change the color of the thread, since the sleeve of the blouse begins. You choose its color yourself, and we will take light green. We knit the first row with a thread of a new color, and then we make a decrease (UB). To do this, you need to knit every 3 and 4 loops together. As a result, you are left with 18 single crochets (RLS).
- Now, from the seventh to the twenty-fourth rows, we simply knit all the single crochet (RLS). As a result, we get a long green "pipe". When all the rows are ready, we fill the foot, leaving a little empty space, fold the pipe hole in half and carefully knit the loops together, getting the finished part. We also make the second foot.
- We turn to the manufacture of hind legs: we knit a heel of dark yarn, dialing a chain of 10 air loops (VP). Now, starting from the second loop, we knit 8 single crochets (RLS), in the 9th loop we make an increase (PR) of five columns and again 8 single crochets (RLS). We make the 1st column (RLS) in the new row, in the 2nd we make an increase (PR), knit 6 more loops, in the next two columns we do the 1st increase (PR), and then create 2 more single crochets ( SBZ).
- We knit the next half in a mirror order, as the first part was knitted, getting 28 loops at the end of the row. In the new row, we make 10 single crochets (SBZ), in the next 9 loops we do the 1st increase, and then again 10 loops. In total, you get 38 columns that complete the heel.
- Now we take a thread of the color of our dog's wool crochet, with the diagrams and descriptions of which we are gradually getting acquainted, and we knit all 38 stitches. In the new row, we knit 10 loops, and the next 12 we make decreases (UB), completing the row again with 10 columns. Then we knit 12 loops, 5 columns of decrease and again 12 loops. We start the row with 8 single crochets, make 6 decrease columns, turning them into 3 columns, and the final row, 9 loops. There are 23 columns in total.

Change the thread to a dark color representing pants, knit the first 23 single crochets (RLS). We knit in this way from the 10th to the 23rd rows. At the first leg, we cut the thread, carefully tucking it into the canvas, and at the second, we leave it intact. Don't forget to put in the filler.
Soft tummy
Now that the legs and arms are ready, let's start making the calf. It was not for nothing that we left the thread on one of the lower paws, since it is from it that we will continue to knit the torso of the toy.
- In the 23rd row, we knit all the loops along the leg, then we collect 10 air loops and again 23 columns near the second leg. The resulting 56 loops we knit the next 3 rows. And in the 4th row, we subtract, getting 50 single crochet. Thus, we knit 4 rows.
- In the 5th row, we reduce the total number of loops by 7 parts, change the thread to the green color of the jacket and knit 43 loops of 3 rows. Again we subtract 6 loops, but we are already making 11 rows of 36 columns, again subtract 6 loops and knit 2 rows. In the next row, we subtract 6 more loops, make one row and leave the thread for further fastening.
- We knit the head according to the scheme given below, having typed 60 loops, we make 9 rows, and then we go to decrease, filling it in advance with a padding polyester.
Mustache, bumps and tail
We knit the ears and muzzle according to the same pattern, but in different colors, making an amigurumi ring, typing columns into it and knitting rows. Ultimately, a "cup" should be obtained, from which we will make the ears, folded in half, and having knitted the muzzle, fill the blank with padding polyester.

Now you can put everything together: sew ears, muzzle, eyes to the head, outline the nose and mouth, sew the head and limbs to the body.
As a decor, we will knit a long scarf and straps for pants, which we will fasten with buttons. On the head, you can add a dark speck, like in real dogs, a forelock of protruding wool. Now that crocheted dogs with descriptions and diagrams are within our reach, you can safely delight yourself and loved ones with homemade toys!
Cat hat "My blue kitten" + MK / by Marina Piskulina /
A funny and fluffy cat hat for autumn / spring. Warm hat, double, with ears. But her special charm lies elsewhere - my child is now at that age when such things and toys seem to be alive and seeing the finished version, there was no limit to the children's delight - after all, she is so fluffy, really real My heart rejoiced with her
Material Semyonovskaya yarn Olga (wool 50%, acrylic 50%, color ultra-white) 50 gr. and Lanoso ANGORAS (60% mohair, 40% acrylic, melange blue-white ) 200 gr., Hook number 2


Side view

And top view)

I don’t give any patterns for the hat, they simply don’t, because it is tied completely out of my head, but I photographed it in the course of knitting and now I will try to give a small master class. To be honest, this will be my first master class, not the most specific one, but quite understandable. I will not show how the simplest loops are knitted, but I will only show what parts the hat consists of, how to put them all together and the stages of its knitting.
When choosing threads for the inner layer of the cap, you need to take into account that the resulting canvas is not prickly. For this I used Olga Semenovskaya yarn, it is soft, not prickly, pleasant to the body and warm.
Let's get started :-)
Cast on a chain of air loops equal to the volume of the child's head and knit the hat with double crochets, from bottom to top, without any increments or increments. We get such a cylinder - this is the inner layer of the future hat

The same, top view, we leave the loops open for now and move to the opposite end of our hat (where we started, to the chain of air loops)

From here, with a thread of a different color, we begin to knit the outer layer of the cap. Its volume should be larger, therefore, having tied the thread and starting to knit the first row, we immediately make increments every 10 columns.

After the first row of the outer layer has been knitted, knit with a 2x2 elastic band for 10 rows. When the elastic is ready, we continue and knit the most laborious stage of all work - the fluffy edge with elongated loops. For a detailed description of how to knit with elongated loops, see here http://www.magiya.com.ua/master_class/mk_hook/7.html The number of fluffy rows is determined by eye or by trying on a child, but we do not tie the whole hat to the end, but we do funny ears on the top of the head. To do this, continuing to knit with elongated loops, closer to the end of the cap we replace them with single crochet, so we knit the middle of the hat with elongated loops, and its sides with single crochet.
We get such a structure (unfolded)

We connect the two sides of the outer layer of the cap from the inside with connecting posts.

We turn the cap inside out and put the inner (white) layer of the cap into the outer (blue-white) one. It becomes obvious that the open sides of the inner layer (the loops that we left not closed) also need to be sewn together.

Separately, we make ears for the hat, we knit the details - only 4 pieces (2 white and 2 different colors).


The first 5 rows of ears are tied with single crochet, straight, without increments or increments. And we knit the rest of the rows with double crochets, subtracting 1 column at the end of each row.
We connect two parts of the ear on the inside

But we sew (or knit with connecting posts) not completely, but only half. From the narrow end of the cap, we drag (thread) into the ears the yarn cut into separate threads. I managed to pull through 45 threads like this.

We tie the threads inside the ears into knots.

We braid the long ends of the threads from the outside into a pigtail, and at the end we also make a knot. We sew our ear to the end, leaving the widest edge not sewn up, which will be attached to the cap. We get like this (from the inside)

We knit the second ear in the same way. We turn the ears to the front side and sew them to the cap with a needle with the same thread

This photo clearly shows the location of the ears.

The hat is ready! If you wish, you can sew toy eyes to it.
Funny dogs "Scottie Dog" - crochetWhat cute little dogs! And they knit very simply, because they consist of only two parts! Sometimes it is too lazy to knit ordinary amigurumi, where you need to knit the head, body and arms-legs separately. A toy like this is a godsend for lazy knitting projects.
Materials:
Yarn of any thickness and a suitable hook. The thicker the yarn, the bigger the dog will be.
Filler
Yarn needle
Ribbon for decoration
Knitting density: not important

Note:
The numbers at the beginning of the sentences do not indicate a row, but a certain stage of knitting.
The dog is knitted forward and backward mainly in single crochet stitches. The work begins with the ears, then the head is knitted. Next, the back and tail are performed. Each successive row of the body joins the head to form the neck. Knitting goes from the back down to the tummy, then the back leg is done, and at the very end - the front leg.
You will need to knit 2 parts and sew them together, not forgetting to fill with filler. One piece can be used as an applique. There are several options for connecting parts. It will be better if a small dog is sewn with a needle and thread, other sizes can be crocheted.
A small dog is about the size of a keychain, and a very large dog is about the size of a pillow.
For a small dog, you will need very little yarn, for a medium one - a little more. For a large dog, 100 grams of thick yarn (100 m in 100 g) was used with a knitting density of 15 SBN = 10 cm.For a very large dog, 500 m of yarn with a knitting density of 20 SBN = 10 cm was used.
All dogs are knitted according to the same principle, only the number of loops and rows differs.
Small size of a Scottie dog.

1.3 vp, start from the 2nd loop from the hook, 1 SS, 1 RLS in the next. vp (= eyelet).
2. 7 vp, start from the 2nd loop from the hook, 6 sc, avoiding twisting, 1 sc over the extreme sc of the ear, 1 sc in the very first ch. (= 1 row = 8 PRS). 1 vp, turn.
3. Knit 4 more rows of sc.
4.13 ch, start at 2nd loop from hook, 1 CC in each of the tracks. 2 vp, 2 sc in the next. vp, 1 sc in each of the next. 9 vp, avoiding twisting, 1 sc in the last. RLS of the head, 1 SS in the next. RLS (= back and tail). 1 vp, turn.
5. 1 SS in SS, 1 SBN in each of the next. 10 sc. 1 vp, turn.
6. 1 sc in each of the tracks. 10 sc, 1 sc in the SS, 1 sc in the next. RLS head, 1 SS in the next. Sc. 1 vp, turn.
7. 2 sc together (first SS and next. Sc), sc to the end of the row. 1 vp, turn.
8. 2 sc in the first sc, 1 sc in each loop to the end of the row (= 13 sc). 1 vp, turn.
9. 2 sc together, sc to the end of the row. 1 vp, turn.
10. For the hind leg: 1 sc in each of the tracks. 2 sc, 2 sc together.
For the front leg: skip 4 sc, attach the thread from the second skein of yarn to the trail. RLS (= 4th RLS, counting from the end of this row). 2 sc together, 1 sc in each of the next. 2 sc.
Rows 11-14 knit for each leg:
11. 1 vp, turn. RLS to the end of the row (= 3 RLS).
12. 1 vp, turn. RLS to the end of the row. 2 vp, turn.
13. start with the 2nd loop from the hook, 2 sc in the 2nd ch. from the hook, avoiding twisting, knit 1 sc in each of the tracks. 3 sc (= 5 sc). 1 vp, turn.
14. 1 sc in each of the tracks. 4 PRS, 1 SS in the last. Sc.
Repeat rows 1-14 for the second half of the dog. Fold the parts and sew together, stuffing tightly with filler when a small hole remains.
Hide the ends of the threads.
Tie a bow around your neck.
Crochet small dog pattern:

Medium dog:

1. 5 vp, start from the 2nd loop from the hook, 1 SS, 1 RLS in the next. vp, 1 PS in the next. vp, 1 CH in the last. vp (= eyelet).
2. 10 vp, start from the 2nd loop from the hook, 1 sc in each of the next. 9 vp, avoiding twisting, 2 sc over the extreme CH of the ear, 1 sc in the very first ch. (= 1 row = 12 PRS). 1 vp, turn.
3. Knit 6 more rows of sc.
4. 21 vp, start from the 2nd loop from the hook, 1 sc in each of the next. 3 vp, 1 PS in each of the next. 3 vp, 2 substations in the next. vp, 1 sc in each of the next. 13 vp, avoiding twisting, 1 sc in the last. RLS of the head, 1 SS in the next. RLS (= back and tail). 1 vp, turn.
5. 1 SS in SS, 1 SBN in each of the next. 14 sc. 1 vp, turn.
6. 1 sc in each of the tracks. 14 sc, 1 sc in the SS, 1 sc in the next. RLS of the head, 1 SS in the next. Sc. 1 vp, turn.
7. 1 SS in SS, 1 SBN in each of the next. 16 sc. 1 vp, turn.
8. 1 sc in each of the tracks. 16 sc, 1 sc in the SS, 1 sc in the next. RLS of the head, 1 SS in the next. Sc. 1 vp, turn.
9. 2 sc together (SS and next sc), sc to the end of the row. 1 vp, turn.
10. 2 sc in the first sc, 1 sc in each loop to the end of the row (= 19 sc). 1 vp, turn.
11. 2 sc together, sc to the end of the row. 1 vp, turn.
12. For the hind leg: 1 sc in each of the tracks. 3 sc, 2 sc together.
For the front leg: skip 8 sc, attach the thread from the 2nd ball to the next. RLS (= 5th loop, counting from the end of this row). 2 sc together, 1 sc in each of the next. 3 sc.
Knit rows 13-17 for each leg:
13. 1 vp, turn. RLS to the end of the row (= 4 RLS).
14. Knit 2 more rows of sc. 1 vp, turn.
15. 1 sc in each of the tracks. 3 sc, 2 sc in the next. RLS (= 5 RLS). 2 vp, turn.
16.Start from the 2nd loop from the hook, 2 sc in the 2nd ch. from the hook, 1 sc in each of the tracks. 5 sc (= 7 sc). 1 vp, turn.
17. Knit 2 more rows of sc.
Cut off the thread, leaving the long end for sewing.
Repeat rows 1-17 for the second half of the dog. Fold the parts and tie the RLS together, sticking the hook into both parts at the same time. Fill tightly with filler when a small hole remains.
Hide the ends of the threads.
Tie a bow around your neck.
Crochet medium dog pattern:

Big dog:
1.2 vp, start from the 2nd loop from the hook, 1 sc, 1 vp, turn.
4. 1 sc in each of the tracks. 2 sc, 2 sc in the last. RLS (= 4 RLS). 1 vp, turn.
6. RLS to the end of the row.
7.14 vp, start from the 2nd loop from the hook, 1 sc in each of the next. 13 VP, avoiding twisting, 1 RLS over each RLS of the ear (= 1 row = 18 RLS). 1 vp, turn.
8. Knit 10 more rows of sc.
9. 35 vp, start with the 2nd loop from the hook, 1 sc in each of the next. 2 vp, 1 PS in each of the next. 3 vp, 1 CH in each of the next. 4 vp, (1 CH, 1 PS) in the next. vp, 1 sc in each of the next. 24 vp, avoiding twisting, 1 sc in the last. RLS of the head, 1 SS in the next. RLS (= back and tail). 1 vp, turn.
10. 1 SS in SS, 1 RLS in each of the next. 25 sc, 1 SS in the SS. 1 vp, turn.
11. 2 sc together (SS and next. Sc), 1 sc in each of the next. 24 sc, 1 sc in the SS, 1 sc in the next. RLS of the head, 1 SS in the next. Sc. 1 vp, turn.
12. 1 SS in SS, 1 SBN in each of the next. 25 sc, 2 sc together. 1 vp, turn.
13. 1 sc in each of the next. 26 sc, 1 sc in the SS, 1 sc in the next. RLS head, 1 SS in the next. Sc. 1 vp, turn.
14. 1 SS in SS, RLS to the end of the row. 1 vp, turn.
15. 1 sc in each of the next. 28 sc, 1 sc in the SS, 1 sc in the next. RLS of the head, 1 SS in the next. Sc. 1 vp, turn.
16. 2 sc together (SS and next sc), sc to the end of the row. 1 vp, turn.
17. RLS to the last two loops, 2 RLS together. 1 vp, turn.
18. 2 sc together, sc to the end of the row. 1 vp, turn.
19. RLS to the last two loops, 2 RLS together. 1 vp, turn.
20. 2 sc together, sc to the end of the row. 1 vp, turn.
21.2 sc in the first sc, 1 sc in each loop to the end of the row (= 27 sc). 1 vp, turn.
22.2 sc together, sc to the end of the row. 1 vp, turn.
23. For the back leg:
A) 1 sc in each of the tracks. 6 sc, 2 sc together. 1 vp, turn.
B) RLS to the end of the row (= 7 RLS). 1 vp, turn.
C) 1 sc in each of the tracks. 5 sc, 2 sc together. 1 vp, turn.
For the front leg:
A): skip 10 sc, attach the thread from the 2nd ball to the next. RLS (= 8th loop from the end of this row). 2 sc together, 1 sc in each of the next. 6 sc.
B): RLS to the end of the row (= 7 RLS). 1 vp, turn.
B): 2 sc together, 1 sc in the first of the next. 5 sc. 1 vp, turn.
Knit rows 24-29 for each leg:
24. RLS to the end of the row (= 6 RLS). 1 vp, turn.
25. Knit 4 more rows of sc. 1 vp, turn.
26. 1 sc in each of the next. 5 sc, 2 sc in the next. RLS (= 7 RLS). 2 vp, turn.
27. start with the 2nd loop from the hook, 2 sc in the 2nd ch. from the hook, 1 sc in each of the tracks. 7 RLS (= 9СБН). 1 vp, turn.
28. Knit 2 more rows of sc. 1 vp, turn.
29. 1 sc in each of the next. 8 sc, 1 SS in the last. Sc.
Cut the thread from one of the legs, do not cut the thread from the other leg.
Tie the whole dog with one row of RLS. Cut off the thread.
Make rows 1-29 for the 2nd half of the dog.
1 vp, tie the entire dog with one row of sc. Do not cut the thread.
Fold both pieces together and tie the SS together by sticking a hook into both halves.
Fill tightly with filler when a small hole remains.
Hide the ends of the threads.
Tie a bow around your neck.
Very large dog:
1.2 vp, 1 sc, 1 vp, turn.
2. 2 sc in sc (= 2 sc). 1 vp, turn.
3. 2 sc in the first sc, 1 sc in the next. RLS (= 3 RLS). 1 vp, turn.
4.1 sc in each of the tracks. 2 sc, 2 sc in the last. RLS (= 4 RLS). 1 vp, turn.
5. 2 sc in the first sc, 1 sc in each of the next. 3 sc (= 5 sc). 1 vp, turn.
6. 1 sc in each of the next. 4 sc, 2 sc in the first sc (= 6 sc). 1 vp, turn.
7. 2 sc in the first sc, 1 sc in each of the next. 5 sc (= 7 sc). 1 vp, turn.
8. 1 sc in each of the tracks. 6 sc, 2 sc in the last. RLS (= 8 RLS). 1 vp, turn.
9. 2 sc in the first sc, 1 sc in each of the next. 7 sc (= 9 sc). 1 vp, turn.
10. 1 sc in each of the tracks. 8 sc, 2 sc in the first sc (= 10 sc). 1 vp, turn.
11. 2 sc in the first sc, 1 sc in each of the next. 9 sc (= 11 sc). 1 vp, turn.
12. RLS to the end of the row.
13. 25 vp, start with the 2nd loop from the hook, 1 sc in each ch. to the end of the row, avoiding twisting, 1 RLS over each RLS of the ear (= 1 row = 35 RLS). 1 vp, turn.
14. RLS, without tying the 1st loop to the end, 2 RLS in the last. RLS (= 36 RLS). 1 vp, turn.
15. 2 sc in the first sc, 1 sc in each sc to the end of the row (= 37 sc). 1 vp, turn.
16. Knit 19 more rows of sc. 1 vp, turn.
17. 1 sc in each of the next. 35 sc, 2 sc together (= 36 sc). 1 vp, turn.
18. 2 sc together, 1 sc in each of the next. 34 sc (= 35 sc).
19. 81 VP, start from the 2nd loop from the hook, 1 sc in each of the next. 6 vp, 2 sc in the next. vp, 3 times, 1 sc in each vp to the end of the row, avoiding twisting, 1 sc in the last. RLS of the head, 1 SS in the next. RLS (= back and tail). 1 vp, turn.
20. 1 SS in SS, 1 SBN in each of the next. 83 sc, 2 sc in the last. Sc. 1 vp, turn.
21.1 sc in each of the next. 85 sc, 1 sc in the next. SS, 1 sc in the next. RLS of the head, 1 SS in the next. Sc. 1 vp, turn.
22. 1 SS in SS, 1 RLS in each of the next. 87 PRS (= to the end of the row), 1 SS in the last. Sc. 1 vp, turn.
23. 1 sc in the SS, 1 sc in each of the next. 8 sc, 2 sc in the next. RLS, 3 times, 1 RLS in each of the next. 63 sc, 1 sc in the next. SS, 1 sc in the next. RLS of the head, 1 SS in the next. Sc. 1 vp, turn.
24. 1 SS in SS, 1 RLS in each of the next. 91 sc (= up to the last 2 loops of the row), 2 sc together. 1 vp, turn.
25. 1 SS in 2 sc, knitted together, 1 SS in each of the next. 3 sc, 1 sc in each of the next. 88 sc, 1 sc in the SS, 1 sc in the next. RLS of the head, 1 SS in the next. Sc. 1 vp, turn.
26. 1 SS in SS, 1 RLS in each of the next. 67 sc, 3 times, 1 SS in the next. Sc. 1 vp, turn.
27. 1 SS in SS, 1 SS in each of the following. 5 sc, 1 sc in each of the next. 73 sc, 1 sc in the SS, 1 sc in the next. RLS of the head, 1 SS in the next. Sc. 1 vp, turn.
28. 1 SS in SS, 1 SBN in each of the next. 67 sc, 2 sc together. 1 vp, turn. (The tail is ready.)
29.2 sc together, 1 sc in each of the next. 66 sc, 1 sc in the SS, 1 sc in the next. RLS of the head, 1 SS in the next. Sc. 1 vp, turn.
30. 1 SS in SS, 1 SBN in each of the next. 67 sc, 2 sc together. 1 vp, turn.
31.2 sc together, 1 sc in each of the next. 66 sc, 1 sc in the SS, 1 sc in the next. RLS of the head, 1 SS in the next. Sc. 1 vp, turn.
32. 1 SS in SS, 1 RLS in each of the next. 69 PRS (= to the end of the row). 1 vp, turn.
33.2 sc together, 1 sc in each of the next. 67 sc, 1 sc in the SS, 1 sc in the next. RLS of the head, 1 SS in the next. Sc. 1 vp, turn.
34. 1 SS in SS, 1 RLS in each of the next. 70 PRS (= to the end of the row). 1 vp, turn.
35.2 sc together, 1 sc in each of the next. 68 sc, 1 sc in the SS, 1 sc in the next. RLS of the head, 1 SS in the next. Sc. 1 vp, turn.
36. 2 sc together (first SS and next. Sc), 1 sc in each of the next. 70 PRS (= to the end of the row). 1 vp, turn.
37. 1 sc in each of the next. 69 sc (= up to two loops to the end of the row), 2 sc together. 1 vp, turn.
38.2 sc together, 1 sc in each of the next. 68 PRS (= to the end of the row). 1 vp, turn.
39. 1 sc in each of the next. 67 sc (= up to two loops to the end of the row), 2 sc together. 1 vp, turn.
40.2 sc together, 1 sc in each of the next. 64 sc (= up to two loops to the end of the row), 2 sc together. 1 vp, turn.
41. 1 sc in each of the next. 64 sc (= up to two loops to the end of the row), 2 sc together. 1 vp, turn.
42.2 sc together, 1 sc in each of the next. 63 sc (= to the end of the row). 1 vp, turn.
43. 1 sc in each of the next. 62 sc (= up to two loops to the end of the row), 2 sc together. 1 vp, turn.
44.2 sc together, 1 sc in each of the next. 61 sc (= to the end of the row). 1 vp, turn.
Greetings! Somehow I received an order for dog snood scarf Cocker Spaniel breed. At that moment, I didn't really think about why they put clothes on pets and how they sew or knit them.
And I was very surprised when a girl who ordered such a scarf from me said that on one of the "dog's" sites there was a queue for the craftswoman who knits them for several months in advance.
It was necessary to knit for this beauty named Foxy.
This is an American Cocker Spaniel. The dog is small, and the ears, as you can see, are long. On the street, of course, they collect all the garbage on themselves for walks. So, as I understood from the words of her mistress, after each walk the dog has to patiently endure the process of combing.
In addition, during feeding, these beautiful ears strive to get into a cup of food)) And the scarf holds them perfectly, without interfering with eating)
Therefore, dressing dogs, in many cases, is a compulsory necessity, and not a whim of their owners.
Note: and I knitted the same scarf for Berta, an adorable dog of the Russian Spaniel breed.
Well, I accepted the order, you need to fulfill it. I began to look for information on the Internet, how and with what yarn they knit for dogs. It turned out that, most often, they use pure acrylic or, with an admixture of another thread.
Regarding the threads that I picked up for the snood scarf, I wrote in detail earlier on my page on LiRu, when I made a short announcement. Below you can read ^

Before starting to knit, I looked on the Internet for descriptions of a snood scarf for dogs. And with disappointment I discovered that only ordinary long scarves for dogs are described, which are already not difficult to knit.
Namely, for some reason, nothing was found about the circular scarf. I had to independently calculate the dimensions, select a pattern, threads, etc. I prepared a small description, with photographs - in the process. I think it can be useful for those who are faced with the need to knit a circular scarf for a dog.
It turned out to be such a scarf-snood. By size asked to tie 13-15 cm wide, 15-17 high, that is, in a circle it turned out to be about 35-40 cm.

Description of crochet dog snood scarf
- yarn "MAGIC" (Germany), 100% microfiber, 50gr / 152m, color 8412 (dark blue);
- and "ALIZE" DIVA STRETCH (Turkey), 8% elastic, 92% microfiber / acrylic, 100gr / 352m, color 57 (burgundy);
- Hook number 3
The girl showed a couple of photos as an example, it was clear that the scarves were tied with a "sirloin net". It felt like the mesh in the middle of the scarf was expanding. Therefore, I decided to choose some motive that has the effect of expansion, that is, "fans".
I picked up the pattern for a long time, because it was necessary so that the little ears did not fall out through the holes. And, at the same time, the mesh should be soft, elastic. I tied the samples three times according to different schemes, until I chose the appropriate one, this one, its scheme is below.

Knitted round, according to the scheme, beginning with blue threads. I put on a chain of the right length. I didn't guess right away with the size, I had to dissolve it. The second time it was more accurate.
- The first row was walked with single crochets.
- To get an extension in the middle, I tied four rows with a "sirloin net" like this: RLS, missed one loop, RLS.
- Continued according to the scheme.

- In the center of the scarf-snood I changed the threads by color.
- I graduated from the "mirror-like" beginning, that is, with a sirloin net. Before that, I measured the height of the rows to the red thread, in order to repeat it on the other side.

Here a closer look showed

When the snood scarf was completely ready, I checked the dimensions, made sure that the scarf has a conical shape, that is, it expands in the central part.

Finally, I put an elastic band through the first and last rows of the mesh so that it can be adjusted on the head and neck after the first fitting.

I tried it on our dog Belka. Easy to put on, no pressure.

I checked how the scarf dries after hand washing. After all, it will have to be washed often after walking. It turned out to be very good and fast. They gave it to the owner, or rather, to her mistress, and received a grateful kind feedback that everything went well. And, now, after walking and eating, Foxy's ears are clean))

Afterword
When I posted the last photo on social networks, they wrote to Odnoklassniki that the dog is very sad in this snood scarf, that we need to stop tormenting it, etc. In fact, I want to say again that the scarf is very soft, the yarn is silky ... And the desire to put it on the animal is caused by the owners not by the desire to decorate, but by care.
And I just fell in love with this dog at first sight) Therefore, I did not refuse the order, although it came in the midst of the season. And at that moment I knew for sure that to complete it I would have to spend a lot of time looking for patterns, etc. But how to refuse to knit for such a sweetheart))
Best regards, Saule Vagapova
Seal
Hello everybody! Today I want to offer you an unusual topic, or rather, even this refers to one of my favorite hobbies. Once upon a time I was fond of knitting and crocheting. With the birth of babies, I rarely began to knit, but then the moment came when the children grew up a little and I had time to make souvenirs with my own hands.
Today I suggest you to knit funny puppies, one might say little animals of dogs, which will be made using the amigurumi technique. Moreover, the New Year is not far off, and the dog will be the symbol of the next year. I hope you enjoy my collection.
I will say right away that I took all the pictures and photos that you will see here exclusively from the Internet, I selected exactly those that I liked the most, and those that are in the public domain for everyone.
I'll start with the simplest and most uncomplicated job descriptions to help beginners figure out how to connect such wonderful creations, because they are only at the very beginning of the path of needlework.
Of course, I understand that many people like certain breeds of dogs and therefore you would probably like to knit exactly the one that you love the most. Perhaps such a pet lives with you, but unfortunately, I cannot provide you with so many diagrams and step-by-step descriptions of all dog breeds.
1. I propose to knit for you the easiest, in my opinion, amigurumi-style doggie.
Such is the mischievous blue puppy that any child will be delighted with.

Knitting work steps:
1. First of all, prepare all the tools and materials for work. Tie the legs and body first.

2. Then proceed with the shaping and knitting of the head.

3. All other parts of the body are knitted separately. Read the instructions and follow all directions.

2. For the little ones, I want to propose to knit such a wonderful masterpiece, just lovely, see for yourself:


3. The next option, generally ridiculous, such little charming cuties can live in your house. They are cute and very small in size. Nothing will go away at all, you can impose a whole bunch of such:

4. You can also crochet a keychain in the shape of a dog.


Do not forget to glue the nose and eyes, ears and paws. Also embroider with a needle and thread the place where the nose, the vertical strip, you can make eyebrows. To make a ponytail, you can simply knit a regular lace from eyelets, and then sew it where the dog's butt is))).
5. You can see a fairly simple version of a dog for beginners in this step-by-step photo instruction:

Crochet crochet dogs amigurumi for the New Year with a description and work diagrams
I could not ignore this topic, because the holidays are coming soon, and this is what I found:

All these four options just sunk into my soul, one of them I share on the pages of my site in more detail with all the descriptions of the work, from these pictures you can associate such a weird little dog. If you have any questions, write your comments, reviews.
Start the craft with the legs, tie two identical legs, and then connect them together.

Thus, they will not be sewn separately.

After tying the torso, tie two legs and ears, and then a muzzle and a red cap, like Santa Claus or Santa Claus.


But the other three master classes, who need to write to me, I will send you to your mail absolutely free of charge, for this just leave a comment at the bottom of this article))). I will definitely answer.
And you know that the coolest thing is, from a brown dog, or rather a template and schemes, you can make not only a puppy, but other animals, for example, a deer, koala, bear and lamb, see for yourself:

The body and the head are the same, such a universal layout, just the design is different. Great and just super idea!
Crochet amigurumi dog toy master class. Videos
Since crocheting puppies is already relevant this year, the time has come when 2018 is just around the corner, so I offer you such detailed stories with such bright multi-colored dogs:
I also suggest that you knit an unusual dog, or you can say a craft in the form of a ball on a Christmas tree:
And here is another video, where it is shown in stages and in detail how to tie a little pug:
White and yellow dog - a symbol of 2018 with your own hands
In fact, the symbol of the coming year will be a dog in light yellow tones, this information is taken from the eastern calendar. Although in some sources it is said about the white dog. I think that in any case, every needlewoman can make such a souvenir of a toy, or a talisman.
Since the opinions were different, then I found two master classes in exactly two different colors. One is quite easy, the other is slightly more difficult, choose the one that you like best.
1. White and such an affectionate-looking puppy named Bobik will decorate any Christmas tree or act as a decoration on a festive table.


2. Well, in the golden color of yellow shades, here is such a cool and super wondrous dog named Chamomile can settle in your house:

That's all for me, but in conclusion, I want to offer you a bunch of pictures and photos with knitted dogs from young craftswomen. Do you want the same ??? Woof woof)))
Perhaps you did not like the options that I showed you before, so choose from these, but I can send you step-by-step instructions and descriptions with diagrams for free to your mail, just write a comment below with a request to send master classes of animals in the form of dogs.
Such a mischievous family I have turned out, just super in my opinion!

The selection is large, but how diverse it is.

There are dogs of different breeds, almost all, well, or most))).

These are pugs, poodles, mongrels, chihuahuas, bulldogs, dolmatians, dachshunds, huskies, dogs in the form of a tilde doll and even the hero Druzhok from the cartoon about the Barboskins, Snoopy. And absolutely for crumbs of babies there is a knitting pattern for a rattle.

I don't know about you, but I like it.

Look at these charming cuties, here are Bobiki and Balls, and even Barbosik with a smile.

DIY crocheted toys have always been appreciated and will be the most original gifts, and most importantly safe for children and adults.

I think that all fans of dogs will certainly be happy with such a selection. In addition, I got it for free, of course I had to go to different sites and collect, so I am happy to share it with you, dear guests and blog readers. I hope someone will find it useful))).
By the way, you can send me your photographs of animals through feedback, just write a letter and I will gladly publish your work here on this site.

That's all for me, I got such a plush and soft selection of toys! See you everyone! Bye Bye!
Best regards, Ekaterina Mantsurova
Related publications
-
 What to do for a retired woman
Retirement is always stressful for any person, because not only the way of life changes, but also the priorities. Many elderly ...
-
 Congratulations on Victory Day in the Great Patriotic War Super congratulations on Victory Day
To congratulate veterans on Victory Day in the Great Patriotic War, finding the right words is not so easy. It is in our power to convey ...