
How to make Christmas tree toys from plastic bottles. Decorating a street tree with handmade toys

Plastic bottles terrify all environmentalists of our planet. The problem is that reusing this (seemingly) convenient device is harmful to the body. How to be? The answer is simple - creativity. New Year's toys from old bottles will create incredible coziness. Making them will be as easy and pleasant as possible, and we will show and tell you how to make them yourself. Let's start with the video.
The easiest craft option
For this craft you will need:
- bottom of the bottle;
- paint / markers / markers;
- needle, thread, fishing line;
- paper;
- ribbon.
It is necessary to cut off the bottom of the bottle (you can take any volume). And then conjure over it: paint or leave the original color, decorate with snowflakes, make a hole and thread the fishing line on which the toy will hang on the tree. You can make a single structure using the same fishing line. All this can be seen in the photo below. We have selected several master classes.


Balls from a bottle
In this case, we just need to cut our bottle into strips. These strips must be the same length and width. They must be glued together at one end, and then at the other in such a way that a future Christmas ball is obtained. You can decorate this ball as you like: therefore, you can build on this, and also refer to the traditional New Year symbols (sequins, ribbons, red / green / gold paints, rain, cones, etc.).


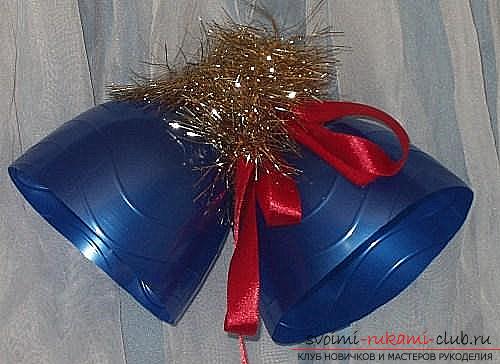
Bells from a bottle
Bells in the form of a New Year's toy will decorate the tree with their presence. How to make them - the upper part of the bottle is needed, because it is similar in shape. You will need paper, foil, paints, tinsel, fishing line, tapes, glue. Part of the bottle must be wrapped in foil, secured with glue (preferably instant fixation) and decorated with snowflakes, tinsel, etc.


One two Three! Shine Christmas tree!
You will need several bottles for this Christmas tree decoration. Again, we take several upper parts, cut them into small strips, put them on top of each other. The lower part can serve as a base. They can be secured with glue, but this is optional. Decorate with balls, beads or tinsel.

A few more ideas ...
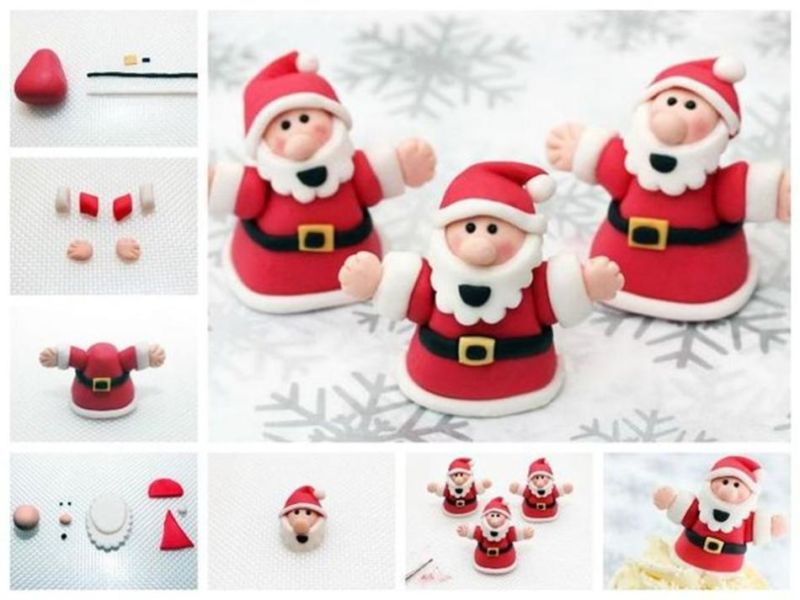
Toys from bottles are just your imagination, which you can literally realize with your own hands. You can take any paints. The form depends on preference. It is not necessary to take small bottles, for example, you can make a grandfather frost from a five-liter bottle (you can make a beard from plastic spoons). Lids can also become a Christmas tree decoration. We've picked up a few ideas.

Most recently, I was visiting my friend. Elena has been doing needlework for a very long time, and it is from her that I often borrow amazing ideas for creativity. Everything that the girl comes up with, she tries to immediately implement.
So this Saturday, she showed me several of her findings, which can be a wonderful help in preparing for the New Year and Christmas. After all, it is not at all necessary to spend a lot of money on purchased decor, when it is quite possible to make it with your own hands from scrap materials.
Christmas crafts from plastic bottles
Editorial staff "So simple!" prepared for you an unusual master class about how to make a christmas bell from a cola bottle. Easier than ever and at no extra cost!

You need
- PVA glue
- linen thread
- packing tape
- plastic bottle

Manufacturing

I also suggest that you familiarize yourself with a few more ideas for New Year's decor which can be made from unnecessary plastic bottles.

We also have a wonderful master class for you on how to create a candy bar using plastic bottles, a colored packaging garland and LED flashlights. On the eve of the New Year, do not be too lazy to make such a decoration. It will come in handy more than once, tested on our own experience!
As you can see, even ordinary plastic bottles can be a great material for creativity. Moreover, the New Year is approaching, which means that you need to create something new and get rid of the old. And these ideas will just help you get rid of the old, while creating an original and beautiful festive decor.
Hello, friends! Well, have you already started the New Year's bustle? We finally bought an artificial one yesterday, but the truth is there is nothing special to dress it up with. Therefore, an interesting idea came to me about how to make Christmas tree decorations with my own hands.
I would like to propose to you to do such a fascinating business. So put laziness aside, call your kids and start creating New Years!
After all, anyway, you have paper, glue, plastic bottles and other materials at hand. Well, there is, right? That's all we need today. From them you can make both the faces of animals, and carved, as well as the Snow Maiden and Santa Claus and a bunch of other wonderful decorations. So don't hesitate, but rather get down to the fun process.
Moreover, there will be more than enough ideas for such an undertaking. As always, I tried and found the best options for making Christmas tree toys from the Internet. And if you are ready, then we begin. 😉
Do not forget that in any business you need to use your own imagination. This is the only way you can get amazing and exclusive souvenirs.
DIY Christmas tree toys from scrap materials for children
First of all, I want to offer you interesting ideas for creating jewelry from different and almost any materials that are in every home.
Be sure to involve your children in creativity, because they are the ones who are most waiting for this magical holiday - New Year. And it will be incredibly pleasant for them to weigh toys on the Christmas tree that they will make themselves.
I suggest you make an interesting decoration in the form of a small Christmas tree from an egg tray.
"Herringbone from the egg tray"

You will need:
- gouache;
- Super glue;
- paper packaging for eggs;
- scissors;
- brushes;
- PVA glue;
- thread;
- pencil.

Manufacturing process:
1. Take a paper bag of eggs and cut out 5-7 cells. Cut out the details from them as shown in the photo. Cut one of the cells in half, this will be the top.

2. Glue the pieces together to form a tree. Roll the parts that turned out from the halves with a cone and glue at the top.

3. Take a green gouache and paint the workpiece.

4. From the remains of the paper packaging, cut out, and if necessary, glue the decorations. Make small balls from a mixture of small pieces of paper and PVA glue.

5. Color the decorations.

6. Dress up the Christmas tree by gluing the entire decor. Do not forget to glue the string by which you will weigh the toy.

7. Cover the product with transparent varnish and dry. All is ready!

If you are a lover of expensive wine, then after emptying the bottle, do not rush to melt with its cork. Collect them. And at the right time they will come in handy. For example, use them for the following purpose.
"Souvenir from wine corks"

You will need:
- 6 natural wine bottle corks;
- natural twine;
- Super glue;
- scissors;
- confetti, small beads.

Manufacturing process:
1. Carefully cut each plug into 3 equal pieces with a knife.

The knife must be sharp so that the plugs do not crumble.
2. You should end up with 18 pieces.

3. Now lay out small triangles from these pieces on a hard surface. One triangle should consist of 6 pieces of cork. There should be 3 triangles in total.

4. Glue each resulting triangle.

5. Cut three strings of 40 cm from the string.

6. Tie each string in the middle, forming a loop.

7. Take the dried up triangle, attach the loop knot to the top, while smearing the place of their contact with glue.

8. Draw the string around the entire triangle, and tie the loose ends tightly into a knot.

9. For a tighter fixation, the thread can also be coated with transparent glue.

10. Do the same with the two remaining triangular blanks.


Now try to make beautiful snowmen out of iron plugs.
"Snowmen"

You will need:
- tapes;
- bottle caps;
- acrylic paints;
- buttons;
- glue.
Manufacturing process:
1. Get three good, non-deformed bottle caps. Wash and dry them. Then paint with white acrylic paint.

2. After the blanks are dry, glue the lids onto the tape, leaving a loop on top.


4. Cut a small strip out of the satin ribbon. This will be a scarf. Tie it over the stoppers. And in the middle, glue a button. A bright decoration in the form of a snowman is completely ready.

You can also use not only the corks, but the bottles themselves. Only not glass, but plastic. For example, cutting them into halves, and then gluing the parts of the desired length, you get an excellent blank for any toy. Imagine. And then, using paints, revive the plastic blanks.
This is how beautiful and bright you can make a penguin. I think everything will be clear to you according to the scheme.

Or fill the bottles with any New Year's souvenirs and decorate the top.

You can also cut strips from plastic and collect a ball.


Here's a simple idea for making small toys out of paper and satin ribbons. Find New Year's pictures on the Internet, print them in the shape of a circle, cut them out. Then glue it onto the cardboard. Weave the ribbons together and paste over the outline with them. Glue the eyelet.

And here's another paper assembly for you. Also a very simple product, just for kids. Print the diagram, cut it out. Assemble the craft along the fold lines, glue it. Decorate with beads, clay, etc. Glue the loop bow. That's all!

"Crystal ball"

You will need:
- half-beads made of glass and plastic;
- foam balls;
- trimming satin ribbons;
- scissors;
- glue gun.
Manufacturing process:
1. Take a foam ball and begin to glue it in a circle with half-beads. At the same time, you can lay out a certain pattern, or make the craft one-color.
Remember to apply the glue in a thin layer or the foam will melt.
2. After you have completely pasted over the entire ball, you just have to embellish it a little more. Simply tie a satin trim bow and glue to the garment. Don't forget the eyelet too.

In the same way, you can make balls from buttons. Only first paint the foam balls with paint, and only then glue the multi-colored buttons.

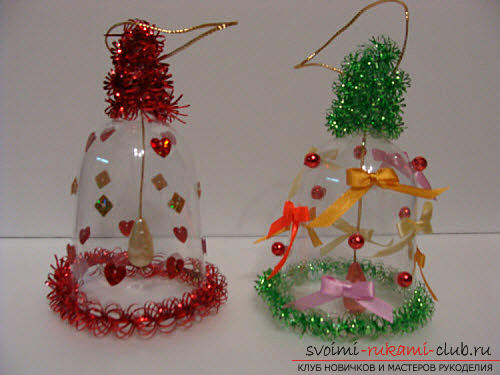
And disposable plastic cups are generally a godsend for creativity. They just need to be turned upside down, and pasted over with paper decorations, sequins, duct tape or painted with paints. And as a result, you can get ringing bells, funny snowmen.


For a change, choose a very simple product - sew or assemble a large Christmas tree bow. Many small bows can be made.

I also came up with the idea to combine the purchased version with homemade art. Buy transparent balls for the Christmas tree, carefully unscrew the top and pour glitter into it. Screw on the product. Or apply glue to the surface of the ball in the form of any pattern and sprinkle with sparkles too. Crafts come out very beautiful.

Of course, do not forget about needlework from thick threads and ordinary glue.


Moreover, the use of this technology will make it possible to craft anything you want.

You can get acquainted with this technique in detail here.

And here is the instruction on how such a miracle can be created.


Interesting products are also obtained from pasta. Usually they are glued together and snowflakes are made in this way.


And a cool idea would be to decorate unnecessary old light bulbs. Usually they are painted with acrylics and decorated with knitted, rag and other attributes.

Also, toys can be molded from salt dough, plasticine or clay.

Or bake real edible souvenirs.

In fact, there are still a lot of festive products that you can make with your own hands from improvised means, just not to list. Therefore, we move on.
Christmas toys, crocheted with patterns
Now a selection for those who are fond of knitting. I found the coolest, in my opinion, crocheted knitted souvenirs. I throw it to you along with the diagrams. Knit, to your health!
- "Bell";

- "Herringbone";

- "Angel";

- "Snowflake";

- "Father Frost";

- "Candy" and "Sock";

- Snowmen;

- "Dog";

- "Mouse";

- "Piggy".

DIY Christmas tree toys made of felt and fabric (patterns and templates are included)
From crocheting, we move on to sewing from felt and any other fabric. Guys, this time I will not explain to you what and how to sew, I'm sure you already know all this. After all, the main thing is to find patterns. This is exactly what I will help you with.
I pumped up a wide variety of options. I am kindly providing them to you. Save, cut and start sewing.


Workshop on making a star on the top of a Christmas tree from paper and cardboard
Well, now let's start making almost the most important attribute of a green tree - a star.
Of course, you can choose another way of making, but I really liked the next magical transformation.
"Star made of shiny cardboard"

You will need:
- shiny cardboard;
- scissors;
- glue gun.
Manufacturing process:
1. Take cardboard and cut strips of the same width and length from it.

If your cardboard is shiny on only one side, then first glue two sheets of cardboard together so that the two sides are shiny.

3. Now bring the free ends of the strips together and glue them together as shown in the photo.

4. Join the side strips together. You should have a blank like this.

5. Repeat steps 1 to 4, that is, glue another exactly the same piece.

6. Connect and glue the two blanks together in such a way that you end up with an eight-pointed star. Your volumetric star on top of the spruce is ready.

I think that such a masterpiece will bring a lot of pleasure, especially when the lights flash on the branches and the star also sparkles with new colors.
Christmas tree toy 2019 in the form of a symbol of the year of the pig
Do you remember what year is coming? That's right, the year of the Pig. So do not forget to appease the Mistress and make souvenirs in the form of funny pigs.
"Colored paper piglet"

You will need:
- double-sided tape on foam;
- semi-cardboard pink and red;
- black marker;
- pencils;
- felt-tip pens;
- glue;
- scissors.

Manufacturing process:
1. Take a pink half-cardboard and cut out many strips 1 cm wide and 7 cm long.

2. Now, using a pencil or scissors, twist each strip.

3. Apply glue to the top of one of the strips and apply another strip on top. In this way, glue the strips in a circle.

4. As a result, you should get such a blank.


6. Now cut a long pink strip 0.5 cm wide.

7. Twist the strip so that you get a curl, like a pig's tail.

8. Glue the ponytail to the ball.

9. Cut out two circles of different diameters and ears from the semi-cardboard. Cut out two small circles out of red paper - these are the nostrils.

10. On a circle with a smaller diameter, glue a piece of double-sided tape. Attach it to a large circle. Use glue to glue the "nostrils".

11. Draw the eyes with a black marker and draw the contours.

12. From red paper, cut out two strips 2 cm wide and 5 cm long. Draw them with the same black marker. This will be a scarf.

13. Glue the scarf to the back of the pig's head. Then glue the head to the torso (volumetric ball). And don't forget to cut and glue the loop.

Agree, this is a very easy craft and is available for children's creativity.
Step-by-step instructions on how to make a Christmas toy out of cotton wool
And ahead of us is a detailed master class on creating another Christmas tree decoration in the form of a bright cockerel. We will make it from ordinary cotton wool.
"Wadded Cockerel"

You will need:
- cardboard (dense, but cutable);
- cotton wool (from a pharmacy, regular in a roll);
- cotton pads;
- the threads are white;
- potato starch;
- half-bead eyes of black color;
- tailor's pin (with a loop at the end);
- paints for painting.
Manufacturing process:
1. Take cardboard and draw the outline of the cockerel on it. Cut it out.

2. Unwind the cotton wool from the roll and wrap the cut-out outline tightly with it up to the legs.

3. Now wind the thread over the cotton. Do the same with the leg.


5. Cut out the wings (4 pcs.) And parts for the tail (4 pcs.) From cotton pads.

6. Cut one comb and two pieces per bar from the cotton pad.

7. Cook the starch paste and coat our cockerel with it. Then wrap our product with thin pieces of dry cotton wool. Grease all irregularities with a paste. Next, saturate all other parts with paste and carefully attach them to the cockerel. Form folds, fluff up the ponytail, in addition, you can make a thin strip of cotton wool and glue it around the neck. Glue the eyes.

8. Dry the garment upside down (hang it on the string we left behind). And then paint it to your liking. Cut the thread and insert a pin, thread an elegant string.

Use this technology to craft other animals, fairytale heroes and characters.
Christmas tree toy "Garland" from plastic bottles
Now we will make a garland decoration. Moreover, the garland will not be simple, but made of plastic bottles. How do you like this idea? Personally, I love it.
"Flower garland"

You will need:
- plastic bottles with lids;
- spray paints;
- scissors;
- electric garland;
Manufacturing process:
1. Cut off the tops of the bottles. Make cuts to make a flower.

2. Round off the petals and paint the blanks in any color.
3. While the flowers are drying, make cross-shaped cuts in the caps of these bottles. Insert the light bulbs from the electric garland into the cuts.

4. When the blanks are dry, screw them to the lids, spread the product around the tree and turn on the electric garland. Admire the creation!

Well, a simple manufacturing option garlands of icicles Crafts for a Christmas tree made of polymer clay
I will briefly tell you what figures can be molded from clay. You can take either plasticine as a material.
Here it is important to come up with a hero, mold the details, then put them together, well, and make a loop.
Here are a couple of schemes for sculpting winter characters.
- Father Frost;

- Monkey;

- Girl;

- Snow Maiden;

- Piggy.

And options for finished works.


Video selection of the best toys for a Christmas tree made of wood
Well, if you are fond of woodwork, then you will be interested in the following story. It contains ideas for creating wooden toys at home. So watch and create. By the way, such souvenirs are perfect for quality.
And on this today I am putting an end to it. I look forward to your comments! Was I useful and creative? 😀 I think it is undeniable - yes.
I wish you to make what you like and, together with the kids, decorate the Christmas tree with homemade toys. Holiday greetings!
Content
And we are here, as always, with our interesting and original ideas for New Year's crafts. This time we will create crafts from plastic bottles. Firstly, do not forget that plastic takes more than 100 years to decompose, so we must use it to the maximum in order to do less harm to nature.
Secondly, these crafts will not require too much cash injections from you. Thirdly, a lot of interesting gizmos can be made from this improvised material. In our article you will find figurines, a garland, a piggy bank, Christmas tree decorations and many other crafts from plastic bottles.

Christmas figures from plastic bottles
These bottle crafts are very easy to create from bottles. Here is a set of required items:
- plastic containers;
- scissors and a stationery knife;
- paints, brushes;
- textile;
- Knitting;
- felt;
- glue gun.
For example, you can make adorable penguins. To do this, you need to cut the workpiece in half, and cut off the bottom for the cap. Next, they need to be painted like penguins, glue the parts with a glue gun and decorate the figures with textiles.

A little tip - instead of a glue gun, you can use scotch tape, which you just paint over later.
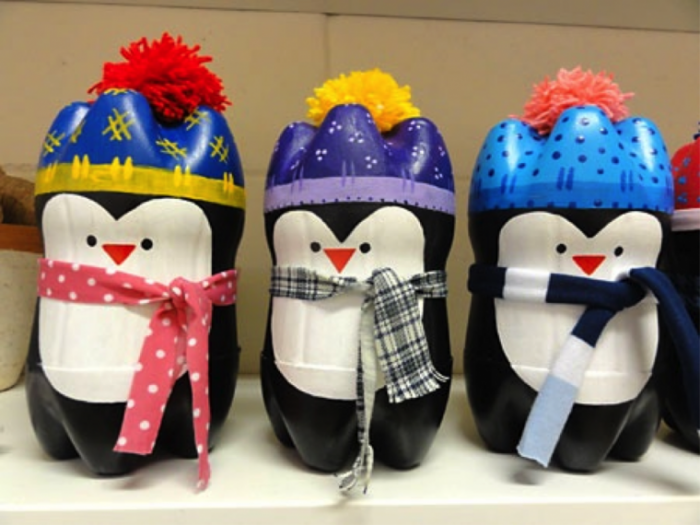
Use acrylic paints, they adhere better to plastic.

From this simple and affordable material, you can also make bright and beautiful apples, which can be placed under the tree or to decorate the kitchen with them. By the way, the decor is suitable not only for the New Year, but also for other holidays.

For a child, you can make a toy - a horse on a stick. If you improvise, you can also create a dog, because this is a symbol of the upcoming 2018. And the color, by the way, is yellow! So use a lot of yellow when creating your wonderful crafts.
Christmas tree decorations from plastic bottles
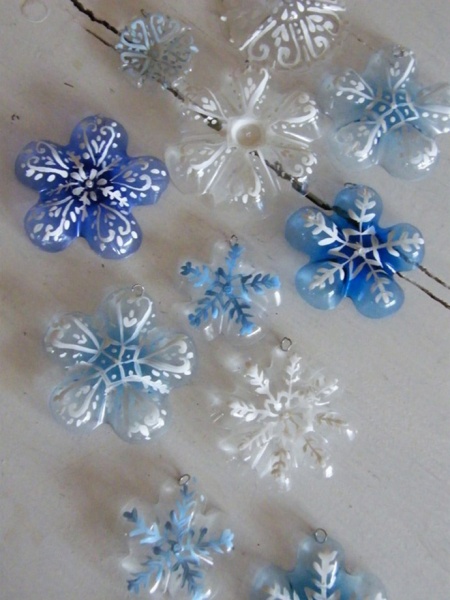
If the house has collected a lot of the material we need, and you already don't know where to put it, then our advice to you is for creativity! Let this container be creative! You can make wonderful snowflakes from the bases. They only need to be slightly colored and attached with a string so that they can be hung. Use a thin brush to paint the pattern. From such blanks, you can create a whole garland or wreath on the door.
Crafts for the New Year from bottles are both original and not expensive.
But these bells are obtained from the tops:

A whole ball can be crafted from bottle bases. Details can be painted, or you can use it in its original form:

Crafts from plastic bottles for the New Year is an opportunity to give a second chance to old things, an opportunity to join the culture of recycling things, sorting garbage. Thus, we consciously approach the use of resources, and besides, you can always call yourself an artist of trash art, and this, by the way, is a very fashionable movement nowadays. In general, such handicraft is good on all fronts!

And the following Christmas balls are made of stripes, which are decorated with various beads, paints, ribbons and other decor:

Snow balls
Another cool idea is to use plastic bottles to create Christmas snowballs. What we need:
- smooth plastic bottles;
- acrylic paints, brushes;
- sequins;
- decorative figurines;
- glue;
- foam or artificial snow;
- sequins, beads.
To begin with, you need to cut off the top and bottom of the bottle so that one tube remains. A circle needs to be cut out of polystyrene along the diameter of the pipe, we will attach our decorative parts to it.
Then, having coated the sides of the foam with glue, it must be glued to the main part of the composition, placing it inside the decoration.
The top and bottom of the pipe can be decorated with cut-off parts of the bottle, glued with a glue gun and decorated with artificial snow and ribbons. Crafts from plastic bottles are ready! You can also sprinkle sequins, sequins and beads inside.
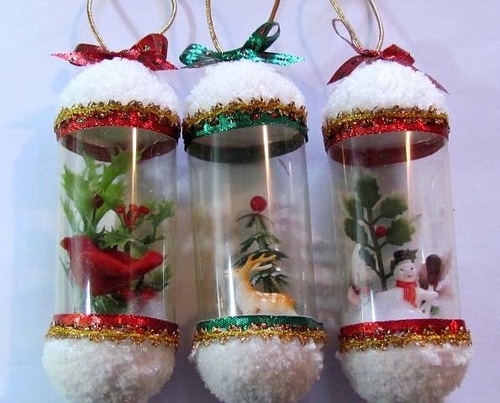
You can, on the contrary, use only the top and bottom to create a kind of New Year's snow globe.

Cones from plastic bottles
Another decor option when plastic is used to create a cone. It is better to use brown blanks immediately.
From your material you need to cut something like daisies and string them on a string. Make blanks of different sizes so that you end up with a bump. Fir branches can be cut from a green bottle.

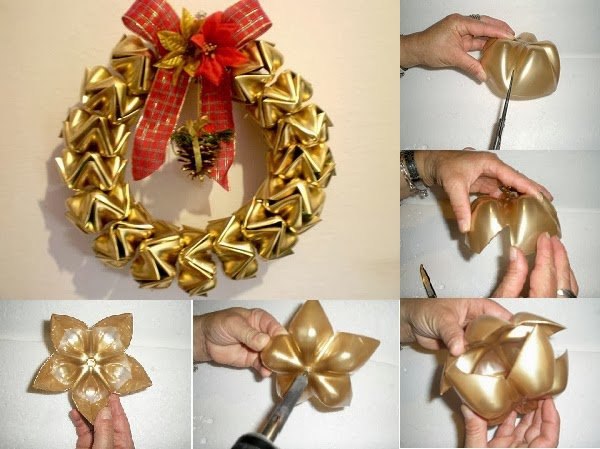
Plastic bottle wreath
For this we need the bottoms of plastic bottles, wire, bow and other decorations.

Details can be painted gold to add pomp and completeness to the craft, as well as disguise the material from which the wreath is made.
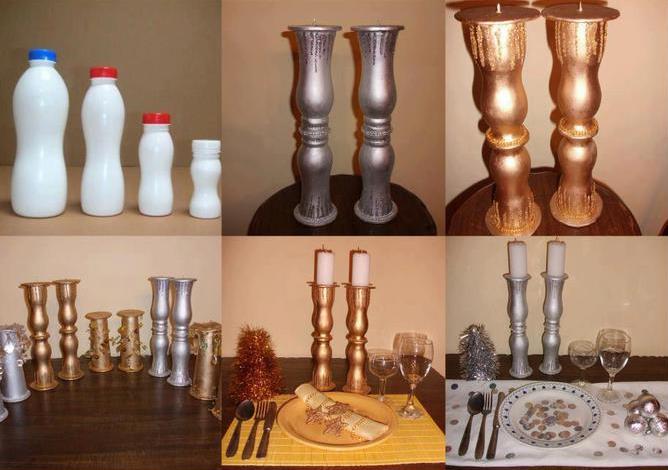
Candlestick for New Year
One of the New Year's attributes is a candle. Well, you and I can make very good candlesticks.

The next candlestick is made of two components, decorated with coffee beans, but, most importantly, this is a beautiful decorative candle.

By the way, do not forget that you can use not only bottles of mineral water or sweet water, but also of yoghurts, kefir and other products.
Souvenirs for the New Year
Something comic and funny can be prepared for guests or kids. For example, make a piggy bank out of a plastic bottle. And what? Very original! It will turn out to make a piggy bank-dog - it will be even better!

Use acrylic or spray paints, felt details, fabric, beads and various other decor for decoration. But children will definitely be delighted with such funny turtles. For the base, use thin kitchen sponges or foamiran. We have already described how to work with this material in our articles.

And how do you like a whole flower bed of tulips in the middle of winter? Such a composition can be used to decorate a summer cottage or a courtyard of a private house. The first time guests will not understand for sure that these beautiful flowers are made from ordinary plastic bottles. As they say, crafts from plastic bottles for the New Year are a manifestation of imagination and ingenuity.
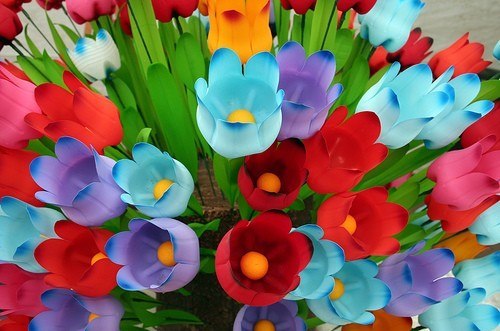
And a few more options for non-winter colors in the performance of the simplest and most affordable material at hand:


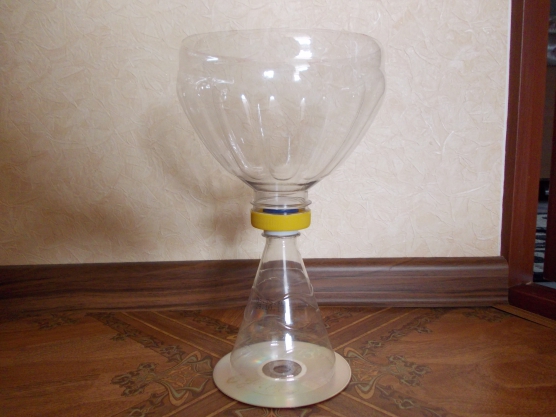
Plastic bottle cup
If you want to stand out from the crowd, have a special attribute, or you need to have a cup in accordance with the costume, then it can very easily be made from the material we know. By the way, read our articles where we tell you how to make crafts for the New Year from a bottle of champagne - this can also come in handy. So, the cup:

Luxurious, right? And, at first glance, you can't tell at all what it is made of, and at the second - too!
The design of a future wine goblet or as a reward might look something like this:
Or like this:

We really like to tell you about various unusual crafts, materials from which you can make amazing things and which are in almost every home. All this in order for you to find a moment for creativity, for relaxation, for your hobby. Slow down the time around you, let, as they say, the whole world wait while you create beautiful things. Well, in conclusion - crafts for the New Year from bottles of video master class:
See how you can create a fun garland that can be hung in the kitchen or in the children's room, or wherever you want, at your discretion.
Post Views: 298
Plastic bottles are no longer garbage, but a material for making various crafts. Disposable containers are used to make vases, dishes, designer jewelry and much more. So why not make a New Year's toy from a plastic bottle? Moreover, there are a lot of ideas in this direction.
Some skeptics argue: “Why make Christmas tree decorations out of garbage? Indeed, in modern stores you can buy very beautiful products! " There is, of course, some truth in this. But Christmas toys from plastic bottles have their own advantages:
Lamp, chandelier or light garland
As you can see in the picture, the bottle has been cut in two. With scissors, you form flowers and you end up putting the little garland bulbs in the ring of the bottle. We love this plastic spoon candle idea! Well, this is not a bottle, but plastic spoons! We decided to include this idea in our selection because it is really very interesting. The principle of its implementation is very simple - you need plastic spoons, rope and glue. Watch the video to see all the stages of its implementation.
To make the candlestick in the picture below, you will need a large plastic bottle. Or a squirrel feeder is a very good idea and ecological restoration. A plastic bottle is perfect for this! Just make a hole, fill it with seeds, and hang it on your patio, balcony or in your garden.
In addition, by using junk materials, you give them a second life and do not throw them away, indirectly caring for the environment. And the pleasant sensation of a New Year's fairy tale appears exactly at the time of making the craft. Try it once, and next year you will only decorate your Christmas tree with toys of your own production. Such activities are very useful for children. During the creative process, the child experiences positive emotions. Handwork also has a beneficial effect on the cognitive sphere: thinking, memory, imagination, and fine motor skills of the hands develop.
Bird and bird feeder for squirrels
Little happy bird of her nursery. Refurbished and original candlesticks? It is very easy to implement and free you to decorate them the way you want! The plastic bottle can be easily converted into original and practical storage accessories.
Teaching children to respect and love nature
Is the plastic bottle turning into a gem? You can create any kind of plastic jewelry. Teaching children to respect the environment is essential. Even if “green” has been in vogue for several years, this trend is still not widespread. Many consider recycling unnecessary and usually do not repair old items rather than throw them away. If you want to teach your kids how to recycle and recuperate, take a weekend off to creative activities. Below you will find two ideas for toys made from plastic.

Christmas balls
To make a Christmas ball you will need:

Instructions
From the middle of the bottle, you need to cut out several rings (3-4 pcs.). The rings should be about 1 cm thick.
Plastic robot, source: Bottle robot. Every year, over Christmas, thousands of plastic items are sold in the country, such as gold and silver threads, aerosol cans and artificial snow, light wires, colored paper, adhesive paper, and every year almost 50% of these products end up in waste. These are the numbers that make us think, but what we can do: Obviously, the solution is not to give up decorating your homes as many of you are used to doing, but simply to use recyclable materials by doing a lot. cases.
Now thread one ring into the other and connect with a paper clip. It is desirable that the rings are arranged symmetrically. The blank for the ball is ready.
Let's start decorating. To do this, you need to coat the rings with glue and sprinkle them, for example, with beads, sparkles, foil of different colors, etc. Tie a silver thread or ribbon to the ball in the form of a loop. A Christmas toy from a plastic bottle is ready!
Let's get excited with little creative recyclers to create decorations to be displayed at home. Ideas are so many and fun, maybe even engaging young children in a healthy and educational game. If you haven't already, try setting aside newspapers, bottles, and caps, as they will certainly be useful for preparing greeting cards.
Simple toys from plastic bottles
For jewelry, there is nothing to look into drawers and find something that can be reused: cardboard items, old T-shirts, and even plastic bottle caps are great for creating original jewelry to lift the mood of the house, tree and crib.
Cones
Pine cone toys have always been hung on the Christmas tree. Previously, they were made of glass, today you can buy plastic jewelry. We will make cones from a plastic bottle. If a child is involved in making the craft, be careful, as you will need to work with fire.
It is necessary to prepare the following tools and materials:
Here are some tips on how to decorate your home for Christmas. With seeds, however, you can give birth to Christmas theme pictures and posters. You just need to have ecological glue, eco-colored shades, and the game is over. A highly decorative product, completely non-toxic and eco-friendly, this is Happy Maza, a game created by a well-known eco-games company made of powdered corn derivative. a natural one that connects bricks to bricks and through which you can create a crazy father, comet stars, Christmas trees, snowmen and many other characters or themed objects.

Instructions
Cut 12 squares of different sizes from a brown bottle (3 small squares should be about ¼ of a large blank).
Now the corners of the squares need to be rounded off, making a chamomile from each blank.
How to decorate your home for Christmas without harming the environment: felting
How to decorate your home for Christmas without harming the environment: felt trees. If you have colored "leftovers" in your home, you might think you will use them to decorate a tree, table, or gifts. Hearts and stars are ideal for home breeding as well as quick cleaning. If, however, you try to do something a little more original, you can play classic Christmas stars, draw silhouettes of flowers on paper sheets, and then cut the felt.
In the next step, we will work with fire. Light a candle and bring the edges of the workpiece to the fire: the petals will go down. Be careful not to melt the plastic. As a result, you should end up with a kind of bowl or plate.
Poke a hole in the middle of each piece. To do this, you need to use an awl.
Bend the copper wire and make a loop (leave room for the pine twig and the beads). Now we need to string our blanks onto the wire: we start with the largest and end with the smallest. Hang a bead between the pieces.
How to decorate your home for Christmas without damaging the environment: deer. It is also useful for creating custom placeholders or decorative balls that you can hang from a tree. In this case, it is enough to cover a small piece of paper or newsprint to give it a round shape and insert colored fabric combs. The most experienced can even create crowns hanging from the door.
How to decorate your home for Christmas without damaging the environment: The crown is hanging by the door. Alternatively, you can create curious shapes by covering small unused objects. You can always make the original with felt. And if you have some pillow cushions, you can sew a beautiful red and green pillow and then decorate it with old buttons or other "recovery minions" that are commonly found in our homes.
We start making a spruce branch. We will make it from a green bottle. Cut out a propeller-like shape from the middle and make frequent cuts (needles) around the edges. Hold the piece over the fire, forming a twig shape.
In the very center of our pine branch, pierce a hole and put it directly on the cone. Hang up a few more beads. You can decorate a festive tree with a New Year's toy from a plastic bottle.
How to decorate your home for Christmas without harming the environment: felt gloves. You can also try to create beautiful and unusual felt closures. How to decorate your home for Christmas without damaging the environment: it feels. Recycling is always a good idea, especially items destined for an awkward box. Glued between them on the rainbow side, you can have sparkling Christmas crowns hang on the door, perhaps enriching them with a red ribbon or decorative bow.
How to decorate your home for Christmas without harming the environment: Decorating paper and recycled plastics. With old notes, you can create stars, balls, or Christmas tablecloths that need to be plasticized for rendering and water repellent.


A wonderful winter holiday is approaching - New Year 2018. It's time to decorate your house for his arrival so that Santa Claus does not pass by on his magic sleigh, and leaves good gifts under our tree. It is very interesting to decorate the Christmas tree and rooms with handmade toys for the holiday. The very process of their manufacture is fascinating, however, like any creativity. Such crafts can be made from the simplest materials, for example, from plastic bottles. From ordinary plastic bottles, you can make a lot of interesting and beautiful things that will successfully replace store counterparts. Our today's story is dedicated to the 7 best and original crafts from plastic bottles for the New Year 2018, which will be held under the sign of the Yellow Dog. Let's take a closer look at them in our article.
With old notes, you can create stars or tablecloths for your Christmas table. How many times have you thrown discarded colored cardboard, paper sheets and plastic bottles, thinking that they could no longer return to us? With cardboard, you can make personalized postcards and greeting cards, or wrap your gifts in an environmentally friendly way, or make fancy illuminated decorations like a Scandinavian-style mini crib.
Christmas cones from plastic bottles
You can make unusual lighting decorations, such as a Scandinavian-style mini crib. It's also perfect for bookmarks and colored locks. The buttons can also be used to create decorative flowers of great effect: get a few thick wooden sticks, fix a flask on a hard disk and glue colored buttons of different types and sizes one after the other, starting with the one with the largest diameter, or make greeting cards.
Christmas tree
An unusual Christmas tree can be made from simple plastic bottles. It is important to collect the necessary materials for this craft and follow the master class step by step.
This will require:
- Plastic bottles;
- Scotch;
- Sandpaper (cardboard);
- Scissors.
Progress:
- The bottom and the neck should be removed from the bottle, and then you get a straight pipe. Then you should prepare blanks from the branches. They must be of different sizes to make the tree cone-shaped.
- Then the plastic bottles need to be cut lengthwise into 3 parts so that the subsequent tiers are less than the previous ones. Needles need to be made on each workpiece, and for this they are cut into thin strips, but not completely. In order for the Christmas tree to stand steadily, it is advisable to use the bottom of one of the bottles as a stand.
- A sheet of cardboard must be rolled into a tube and installed in the neck of the bottle. You can fix it with tape. Now each tier of branches needs to be fixed on the tree. You can put a toy on the top or come up with something else. To make the Christmas tree fluffy, the needles should be cut thinner. Usually, blue or transparent bottles are used for this. That's all, our craft is ready!
Christmas balls
You can decorate your Christmas tree with handmade toys. In work, it is important to follow all the steps in stages, and then you will get wonderful products.
Christmas balls from plastic bottles
How to decorate your home for Christmas without harming the environment: recycled materials. Stars, snowflakes, trees, angels, sticks, bells and hearts can always be created from recycled paper or plastic bottle bottles. Draw shapes on the sheet, cut out and paint them.
How to decorate your home for Christmas without harming the environment: edible decorations
Paper and cardboard stars and balls made from recycled balls. Here is a fun and colorful advent calendar. Not just felt paper, plastic and buttons. Why not think of letter-shaped biscuits or decorate with icing, better homemade so you can hang on a tree and also give to kids and dear friends, perhaps in delicious tin cans.
This will require:
- Plastic bottle;
- Glue;
- Rain;
- Any shiny jewelry.

Progress:
- The paper needs to be wrapped around the bottle to help mark the blanks on it. It is necessary to cut 4 rings 1 cm wide. Then the rings must be fastened together according to the principle "crosswise" and fixed with glue. The result should be a ball of plastic strips. You need to choose beautiful threads or rain so that the toy can be used for the Christmas tree.
- To decorate the resulting blanks, it is better to use foil, beads, beads, etc. A small ball can be placed inside such a ball. In this craft, you can fantasize as much as you like. This will be a very interesting activity for children.
Snowflakes from plastic bottles

Here are some corn maize to hang from a tree. Cookies to give to children and dear friends, perhaps in tasty cans. The risk here is that your jewelry won't be up until December 25th, but it can be a good way to spend a pleasant day with your kids and friends. Who could hold onto a sweet garland of colorful cookies or candy?
This will require
Colorful candy garland to hang on your door! Cookies for sight to pass in a red ribbon and hang on the fireplace and on the walls. From the classic cookie box to cookies of all shapes, with a small hole to hang them on cinnamon sticks. It will be a greedy and creative Christmas for everyone to enjoy!
To expand the range of crafts from plastic bottles for the New Year 2018, you can also make snowflakes from the bottoms of bottles as a Christmas tree decoration. This process will be within the power of beginners in this creative business.
To work you will need:
- Scissors;
- Acrylic paints of white, blue, golden, silver color - to choose from;
- Plastic bottles, preferably blue;
- Paint brush;
- Wire;
- Pliers.
Progress:
Decorations to eat and hang from tree branches. Also on the table there may be curious decorations in the form of a seedling with cheese and vegetables: an unusual way to decorate a Christmas dinner. Strawberry or Santa Claus hat? Why not imagine a tree-like dessert?
This is the right opportunity to show that you are even more sensitive to nature, which we ourselves are endangering. If you want to make your next Christmas even more sustainable, read these articles as well. How to replace a plastic bottle with a colored pet or white snowman? Just colored paper, paint, glue and enough. Plastic empty bottle like it was such an inconspicuous thing and so much fun to play!
- We take plastic bottles and with a clerical knife or scissors cut the bottom as low as possible to the base, leaving only the corrugated part.
- After the bottoms are ready, we start painting our future snowflakes. Depending on the desired pattern, we select the thickness of the brush, and then proceed to the art. As pictures, you can use various ornaments that come to mind. This also applies to the choice of the color of paints with which you will decorate your New Year's product.
- When your snowflake has turned into a beautifully painted masterpiece, give it time to dry, and you use wire and pliers to make a small eyelet for the thread. Attach it to the snowflake and pull the thread through this ring.
Well, our New Year's toy for Christmas decorations is ready, which you now have the right to be proud of. A self-made snowflake can serve as a worthy decoration not only for your home, but also for a kindergarten, if you have a small child, and also act as an exhibit at an exhibition at a school of New Year's products.
Sitting at home with Jas, we organize our own classes. And now there are regular plastic bottles for drinks and yoghurt. Today, 2 ideas on how to use old bottles to create really interesting things. How to use a regular plastic bottle when playing with your child. Today we are going to show you how to make snowmen and plastic dog bottles.
To make a snowman, we need. In 2 plastic bottles, we only had white color, which made it easier to work with hot glue and such ordinary school scissors, a black cardboard box and eyelets made of any material or paper paint. The bottle, if you don't have a white bottle, can be dyed or covered with thin white paper, or possibly smooth paper. When the bottle is dry, we draw a test tube and make a hat of any color, black cardboard or foam, cut out circles and insert eyes and buttons.
Penguins from plastic bottles

Penguins from plastic bottles, which should be placed in the rooms and under the tree as a decor, can become an original New Year's decoration of your home for the New Year 2018. Such a craft will delight all your family and guests, especially children. Without spending a lot of time, you will create a real masterpiece of art with your own hands, which will cause a lot of positive emotions and sincere smiles from your household.
To work you will need:
- Plastic bottles (one toy takes two bottles);
- Scissors;
- Acrylic paints - white, black, red and others;
- Brushes;
- Small colored scraps for a scarf;
- Buboes or bows for hats;
- Glue.
Progress:
- We take the bottle and cut off the top part almost completely or half to make the body of the penguin. The head is made from another bottle and also from the bottom, but the blank should be slightly smaller.
- We connect both blanks by inserting the upper part, which is smaller, into the lower, which is larger.
- After you have built the body of the penguin, start painting it. Take acrylic paints and apply gently to the plastic product, imitating the color of the penguin, as shown in the photo. Use more bright colors, because the brighter your New Year's penguin turns out, the warmer and more cheerful the smiles of your family will be.
- When your penguin looks realistic, you can tie a small scarf around his neck, and attach a bubo or a bow to the hat with glue.
Here you have such a cartoon miracle!
Video tutorial on making penguins from plastic bottles
Golden bells

Golden bells will look original on the New Year tree. This work is done very quickly and is suitable for a kindergarten.
This will require:
- Plastic bottles;
- Acrylic paint, if desired, fabrics, ribbons and accessories can be used instead of acrylic paint.
Progress:
- For work, you should take bottles of 0.5 liters., But more is possible if the tree is very large. The bottom of the bottle should be cut off. To get the bell petals, you need to cut the edge of the bottle in a zigzag fashion. Since the resulting edges will be sharp, care must be taken.
- The petals of our craft need to be made pointed, and you can shape them with a knife. To get the holes for the string, you need to heat the knitting needle and make the holes. You can do this work with scissors, only very carefully. At the end of the work, the bells should be painted, and they will dry within an hour. To give the products a New Year's look, they need to be decorated with tinsel, garlands or sparkles. The instruction is simple, and you can perform the work in your own sequence.
Candlesticks from a plastic bottle

This will require:
- Plastic bottles;
- Scissors;
- Glue gun;
- Universal adhesive.
Progress:
- You can make a wonderful candlestick for the holiday with your own hands. You can use bottles of different colors. The containers must be cut in half. The edges of the part that remained with the bottom should be cut into strips, not reaching 4 cm. The strips can be of different widths. The resulting container will be a candle holder.
- The plastic strips should be melted over the candle. Then, using a glue gun, you need to attach the candle in the foil. The space around the candle can be decorated with beads or pebbles. So the candlestick will be lightweight, our craft is ready.
Video master class on making candlesticks
Cone
You can make original cones with your own hands, this craft from a plastic bottle will perfectly decorate your Christmas tree and home for the New Year 2018.
This will require:
- Plastic bottles;
- Scissors;

Progress:
- You need to create squares from a plastic bottle, after which their corners should be rounded. The result is products like chamomile. After that, you need to process the edges of the petals with a candle so that they go down.
- All details must be strung on a string in descending order. A bead must be inserted between them. Then you need to make a spruce twig and fix it on the cone. The product is ready to create a festive atmosphere.
Related publications
-
 What to do for a retired woman
Retirement is always stressful for any person, because not only the way of life changes, but also the priorities. Many elderly ...
-
 Congratulations on Victory Day in the Great Patriotic War Super congratulations on Victory Day
To congratulate veterans on Victory Day in the Great Patriotic War, finding the right words is not so easy. It is in our power to convey ...